
The want to capture the world in all it’s glory in a single image or even a video is not new. We’ve been taking panoramas for hundreds of years, and even the rovers on the moons and Mars have sent back such pictures. Panoramas have helped us understand the world, to share locations faithfully and transport people to places they could never visit themselves.
There is an incredible body of knowledge to draw from thanks to photography, that allows us not to have to re-invent the wheel and gives a clear view of what problems are likely to arise and which challenges we’ll have to overcome.
Quick Navigation
What is a panorama anyway?
The Problem of parallax
360 Degree panoramas
Panoramic Video
Further Reading
THE BIG PICTURE WORKFLOW
Over the following chapters, each step in the creation of a panoramic video will be discussed. Before we dive into the whole workflow, discussing the challenges and obstacles, here is a brief overview of what we’ll be trying to do.
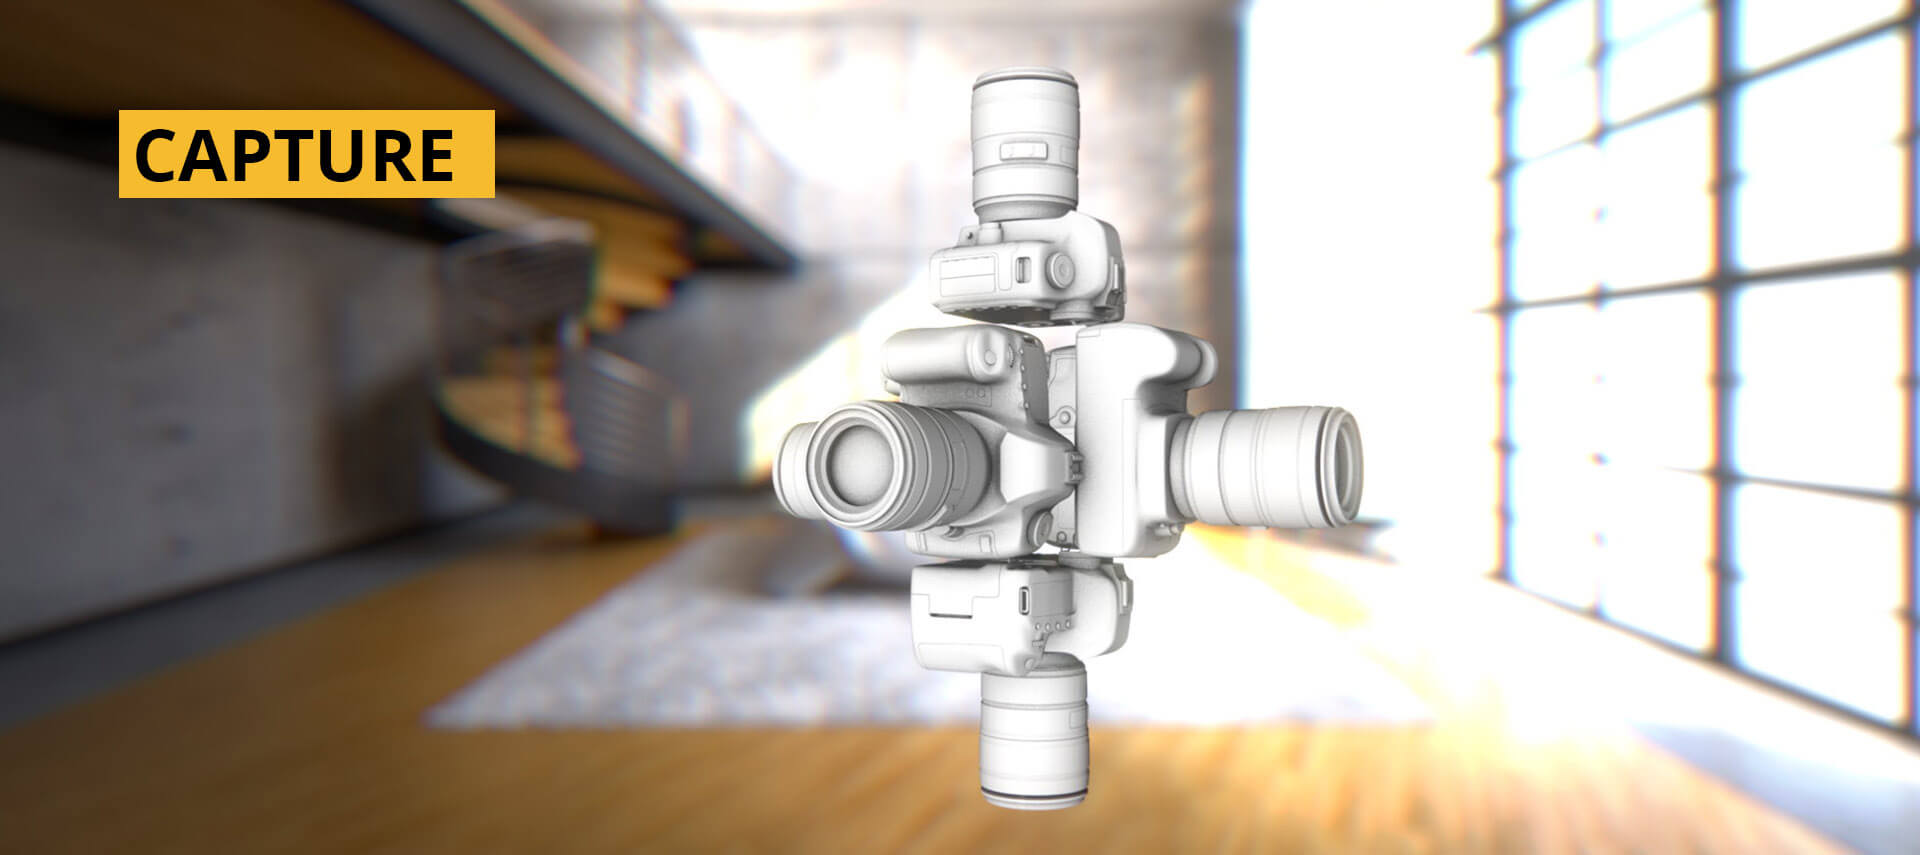
Using normal camera gear, tripods and software, we will capture a scene either in parts or all at once.
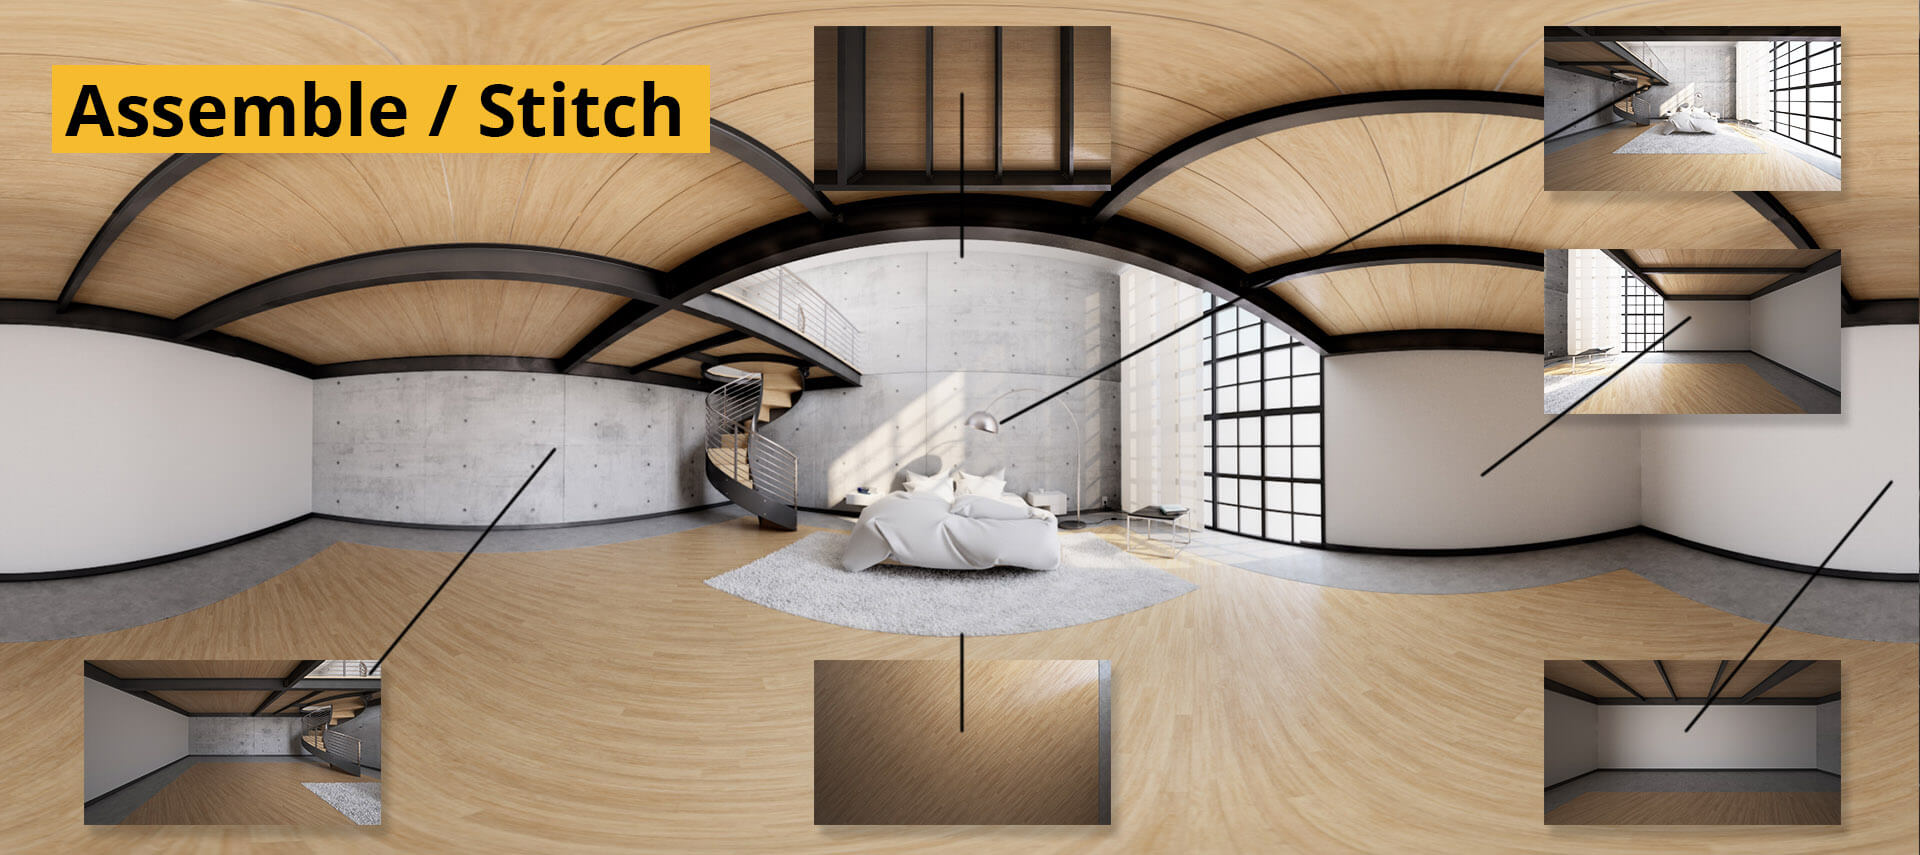
The footage will be joined together to generate a special piece of footage that stores the entire spherical image.
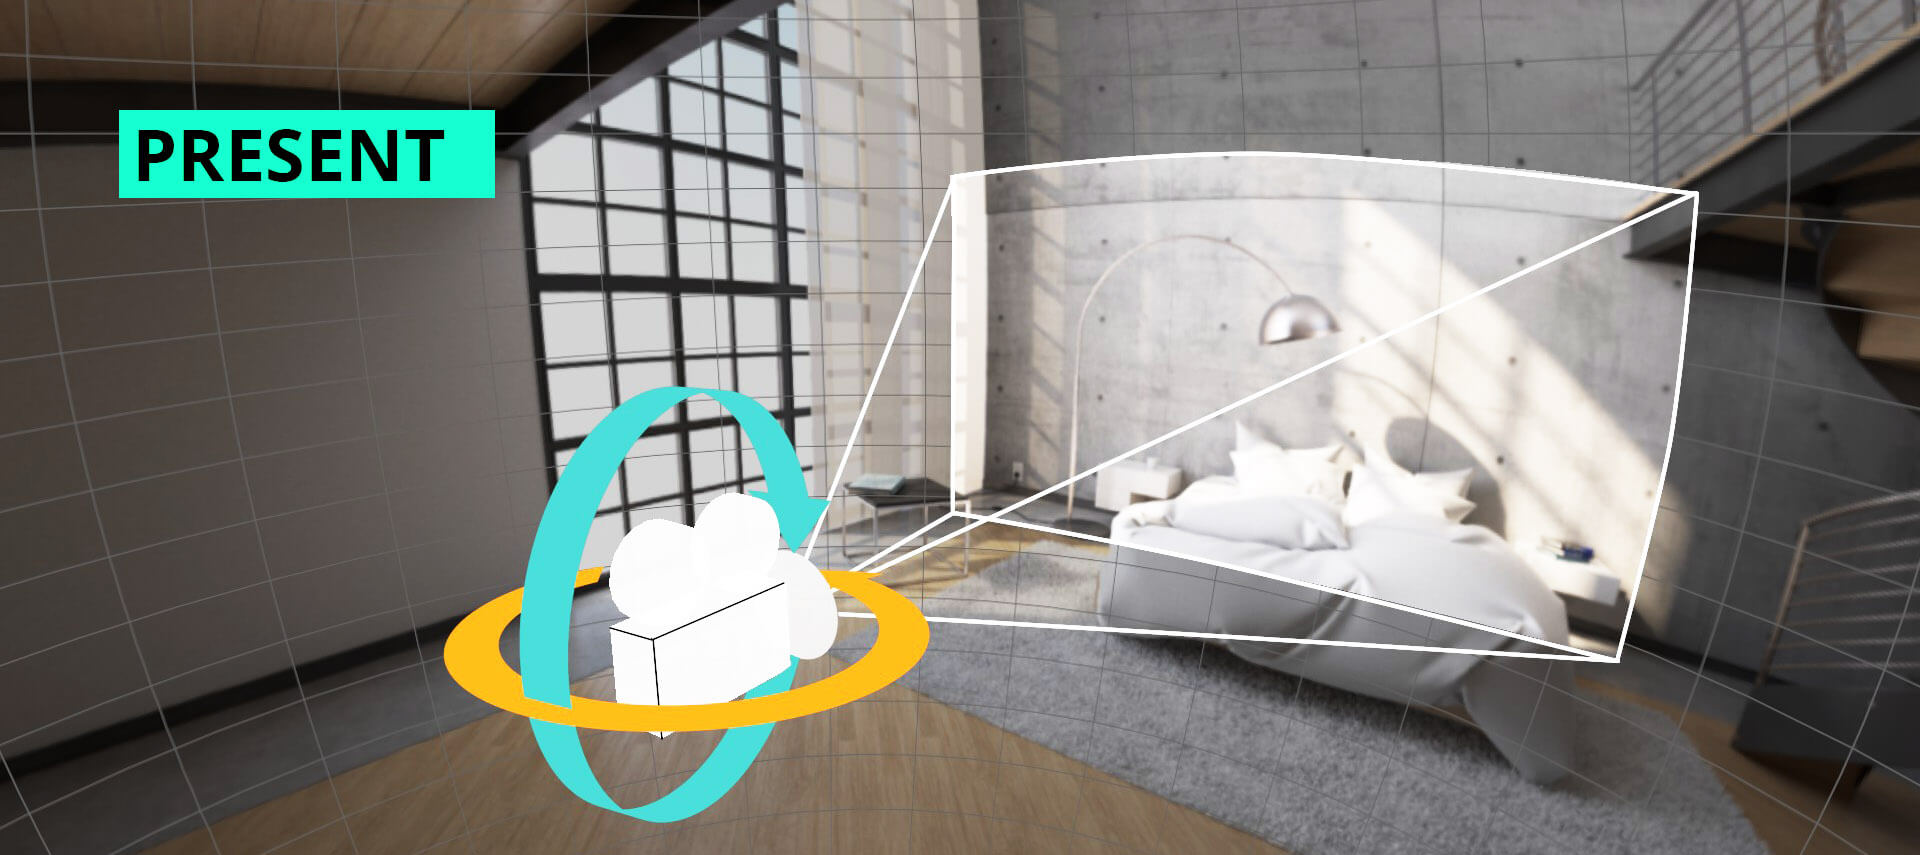
That view will be loaded into a special kind of video player that change the spherical image back into a normal view, like any other movie. That view can be moved around, using a mouse, keyboard or even the gyroscope in a phone allowing people to look wherever they want to within the world we created.

Another way of letting people explore your video is using a head mounted display like the Oculus rift, or using a special container made for smartphones. Google’s cardboard for example. These devices are made to be worn like a mask or helmet, and let people look around naturally.
What is a panorama anyway?
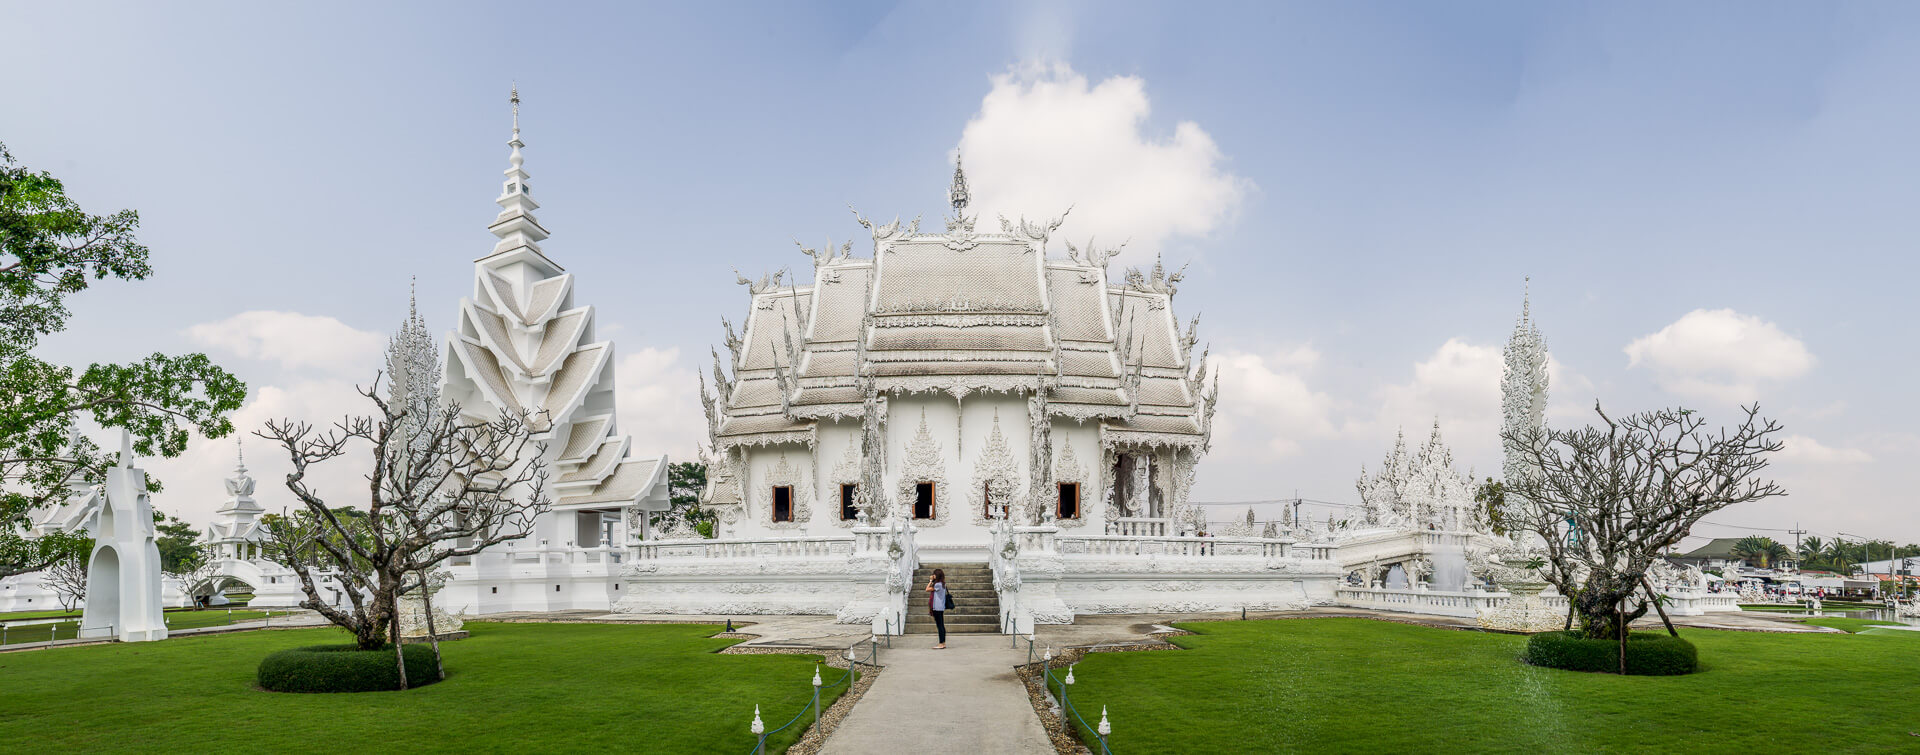
Panoramic photography is a well-established technique allowing photographers to capture scenes with greater control and higher quality than their equipment may be capable of. By taking many images of the same location, from slightly different camera angles, the images can be composited together to create a new image that is vastly more detailed. Today, this principle is widely used in astro-photography and in satellite imagery to create what are sometimes known as petapixel images, images that have billions of pixels. Created by stitching together hundreds of smaller pictures.
With that in mind, a panorama, in essence, is nothing more than pictures joined at the edges. But in order to create an accurate representation of the world panoramic photographers go to great lengths to combat the effects of parallax.
The Problem of parallax
When a camera is moved around, the distance between objects in the foreground and the background changes – this change is referred to as parallax. And for filming 360, there is no greater enemy.
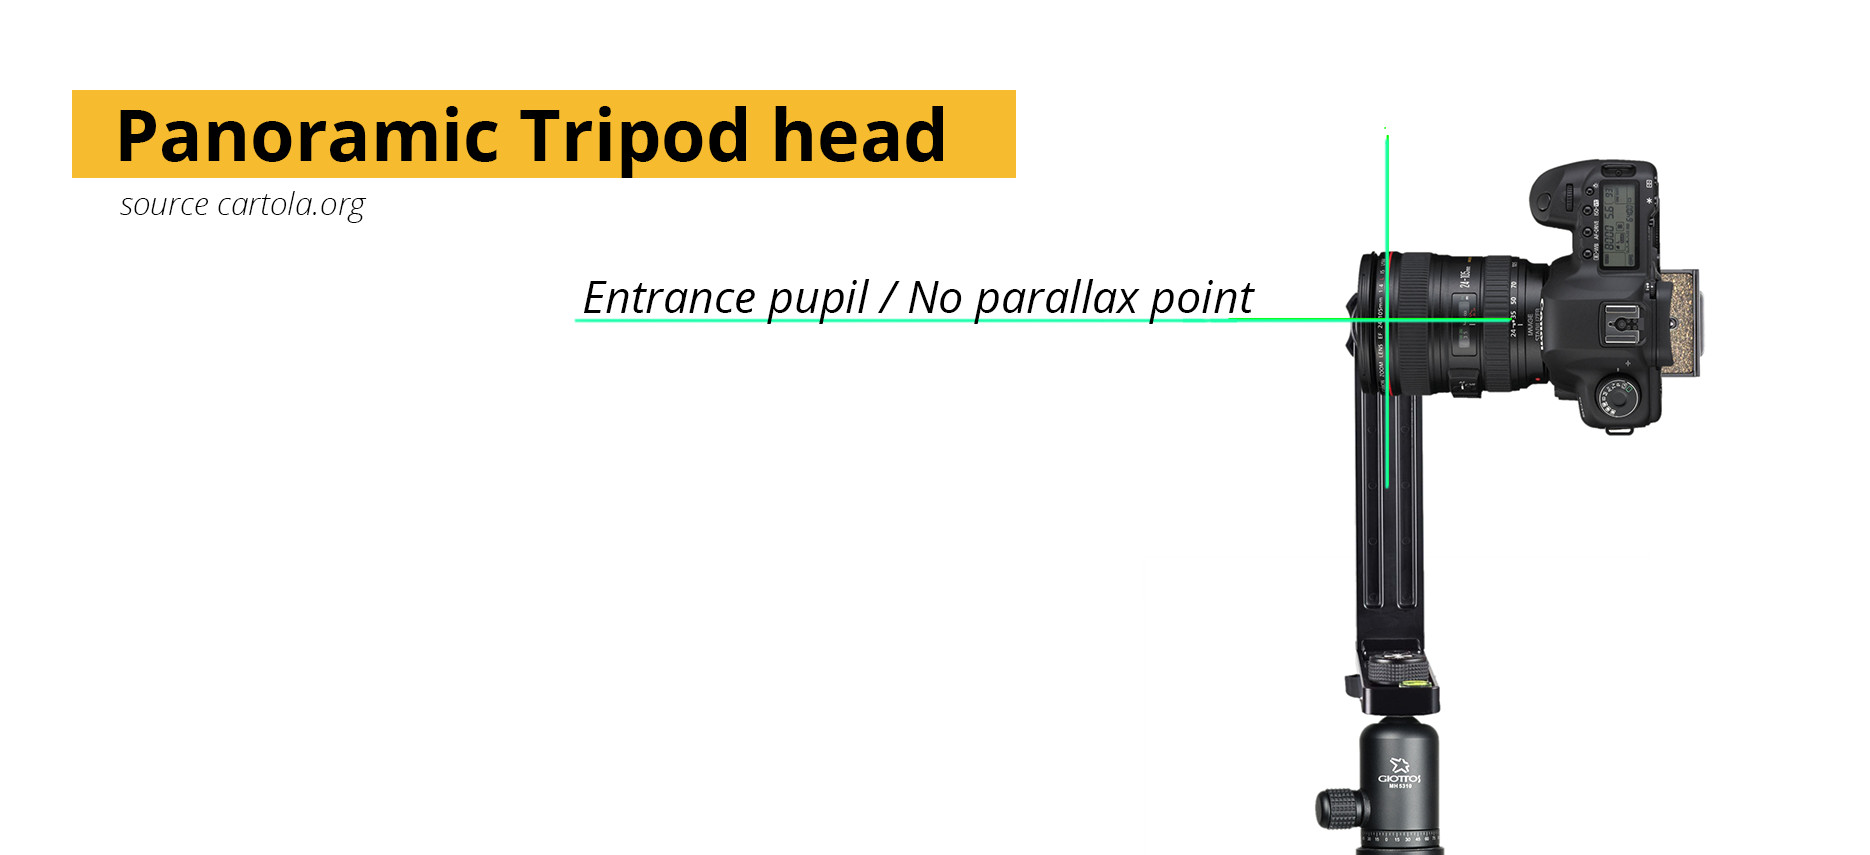
Parallax is created whenever the distance between objects change. The distance changes whenever the camera moves (side-to-side, forward-and-backwards or up-and-down) or rotates. To escape the effects of parallax when rotating the camera, it is necessary to ensure that the distance between the camera and its subject doesn’t change at all – and that means finding the point inside (or sometimes even outside) the camera where all the rays of light meet before being captured by the camera. This point is aptly named the no-parallax point, though it is sometimes incorrectly called the nodal point. Another correct term is the entrance pupil.
A simple example of a camera capturing a scene by rotating around its no-parallax point is your eye. If you hold your head still and rotate your eyes, notice how the relationship between objects in the room remain constant and nothing seems to move. Now, keeping your eyes facing forward, move your head around – and notice the relationships change. Your eyes are doing a remarkable job of capturing a parallax free panorama.
When a camera captures a scene by not rotating along it’s no-parallax point, each image will have small differences in the relationship between points in the scene. When those differences are close to the edges, and the images are stitched together the differences can be seen as “ghosts”. Objects that appear multiple times in different spots, sometimes half visible or removed completely. Once a parallax error is captured, it becomes very difficult to match the picture well.

To overcome parallax in photography a special tripod head is used. Heads like the the nodal ninja, allows the pivot point (the point around which the camera rotates) to be moved forward and backwards to align it with the entrance pupil. Some lenses mark the location of the entrance pupil on the lens, but most do not. A guide to finding the no-parallax point of a lens can be found in the further reading section at the bottom of this chapter. An easy way to get a rough indication of where the entrance pupil is located, is to look into the front of your lens. The depth at which the diaphragm seems to be floating is the correct entrance pupil.
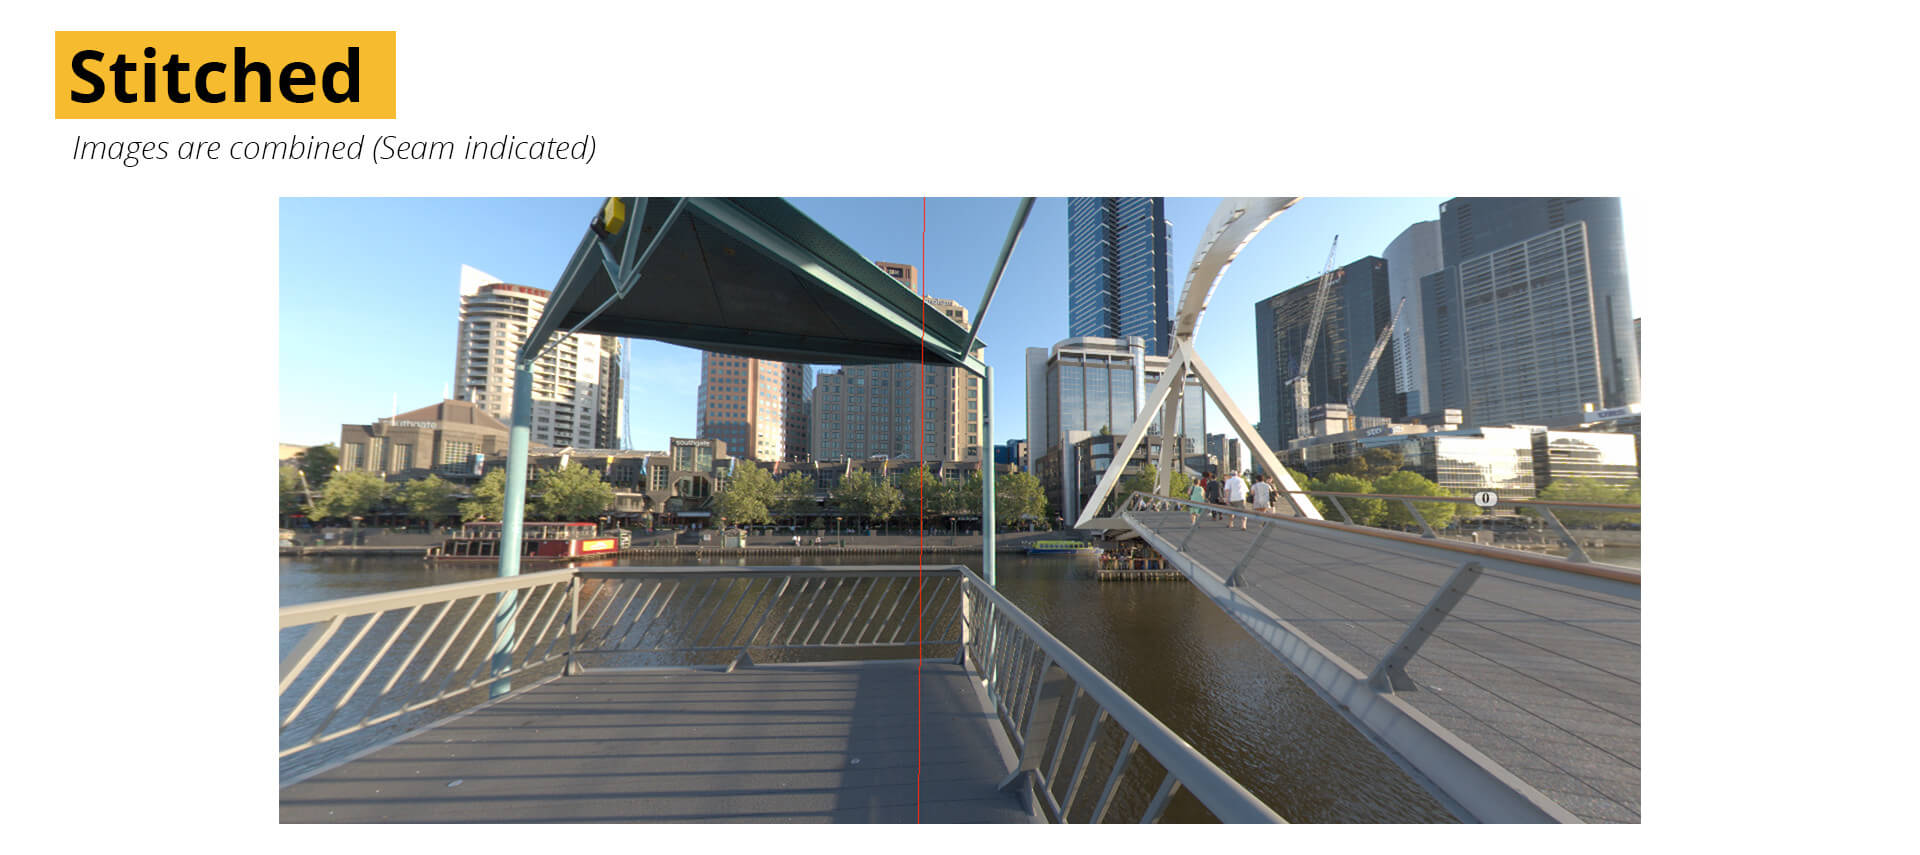
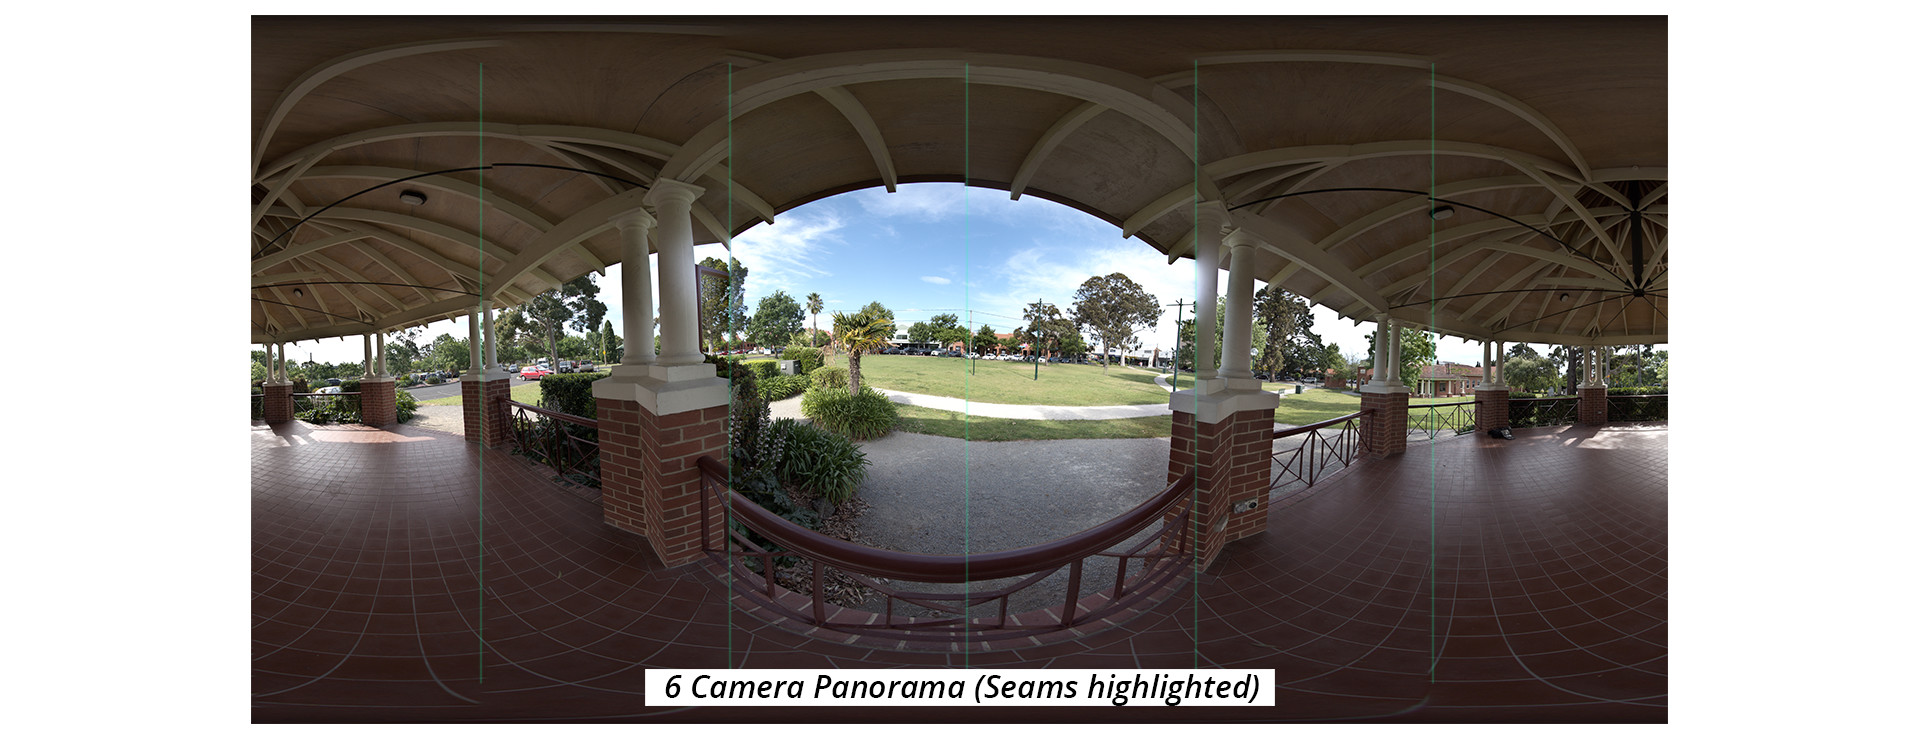
Getting a series of images without parallax is most of the battle in making panoramas. To make sure the images stitch together easily after capture, it is best to overlap the picture edges by a fair amount.
By having overlap, it is easier to see how the pictures fit together, and gives a lot of flexibility for hiding the joining lines between photos, often called the seams. By having overlapping regions also allows the stitching to be automated with software. Programs like Photoshop or PtGui, have the ability to analyse images, find parts that are similar and combine the images into panoramas with little or no user interaction needed.
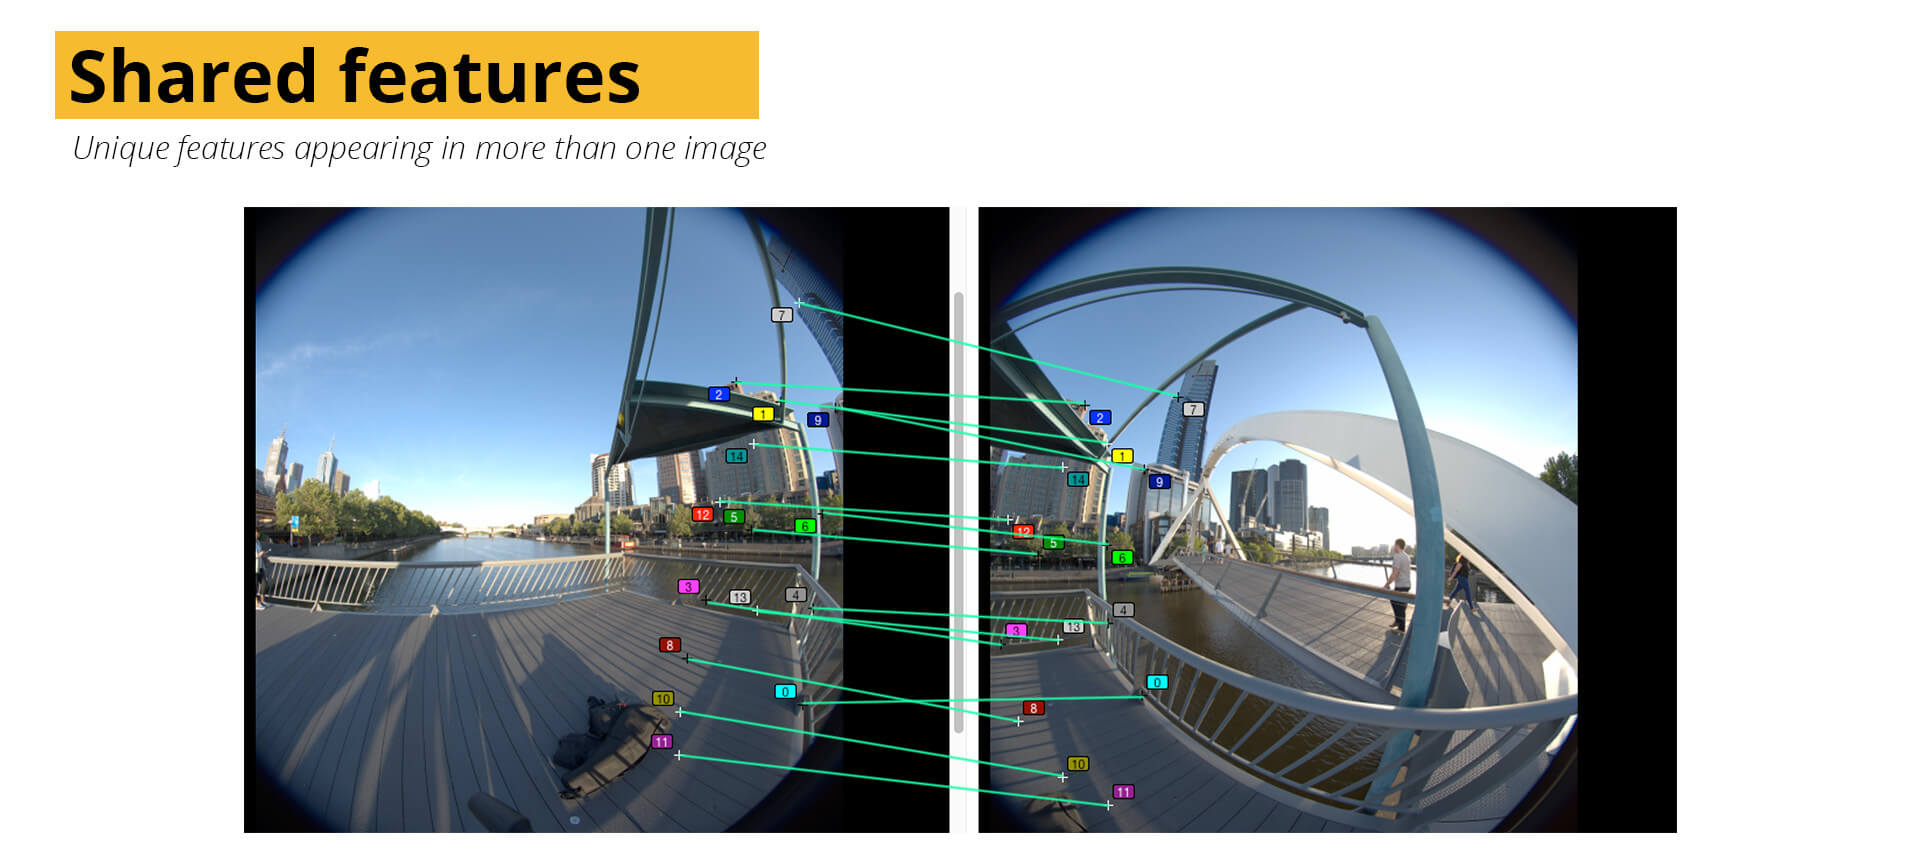
Athough it depends on the scene, a good rule of thumb is to have about a third of the picture overlapping, some software packages still do very well with far less though. Overlap is only useful if there are details visible however, and areas with little or no discerning detail (features) won’t be able to be stitched automatically.
Interestingly, most modern smartphones have to ability to take a panoramic photograph simply by rotating the phone around at a steady pace. With the phone’s software dynamically finding areas that are similar, and static, and stitching the image as you go. By searching for static parts as you go, they often yield great results with no or fewer errors. Although even this method doesn’t quite work all the time…
360 degree panoramas
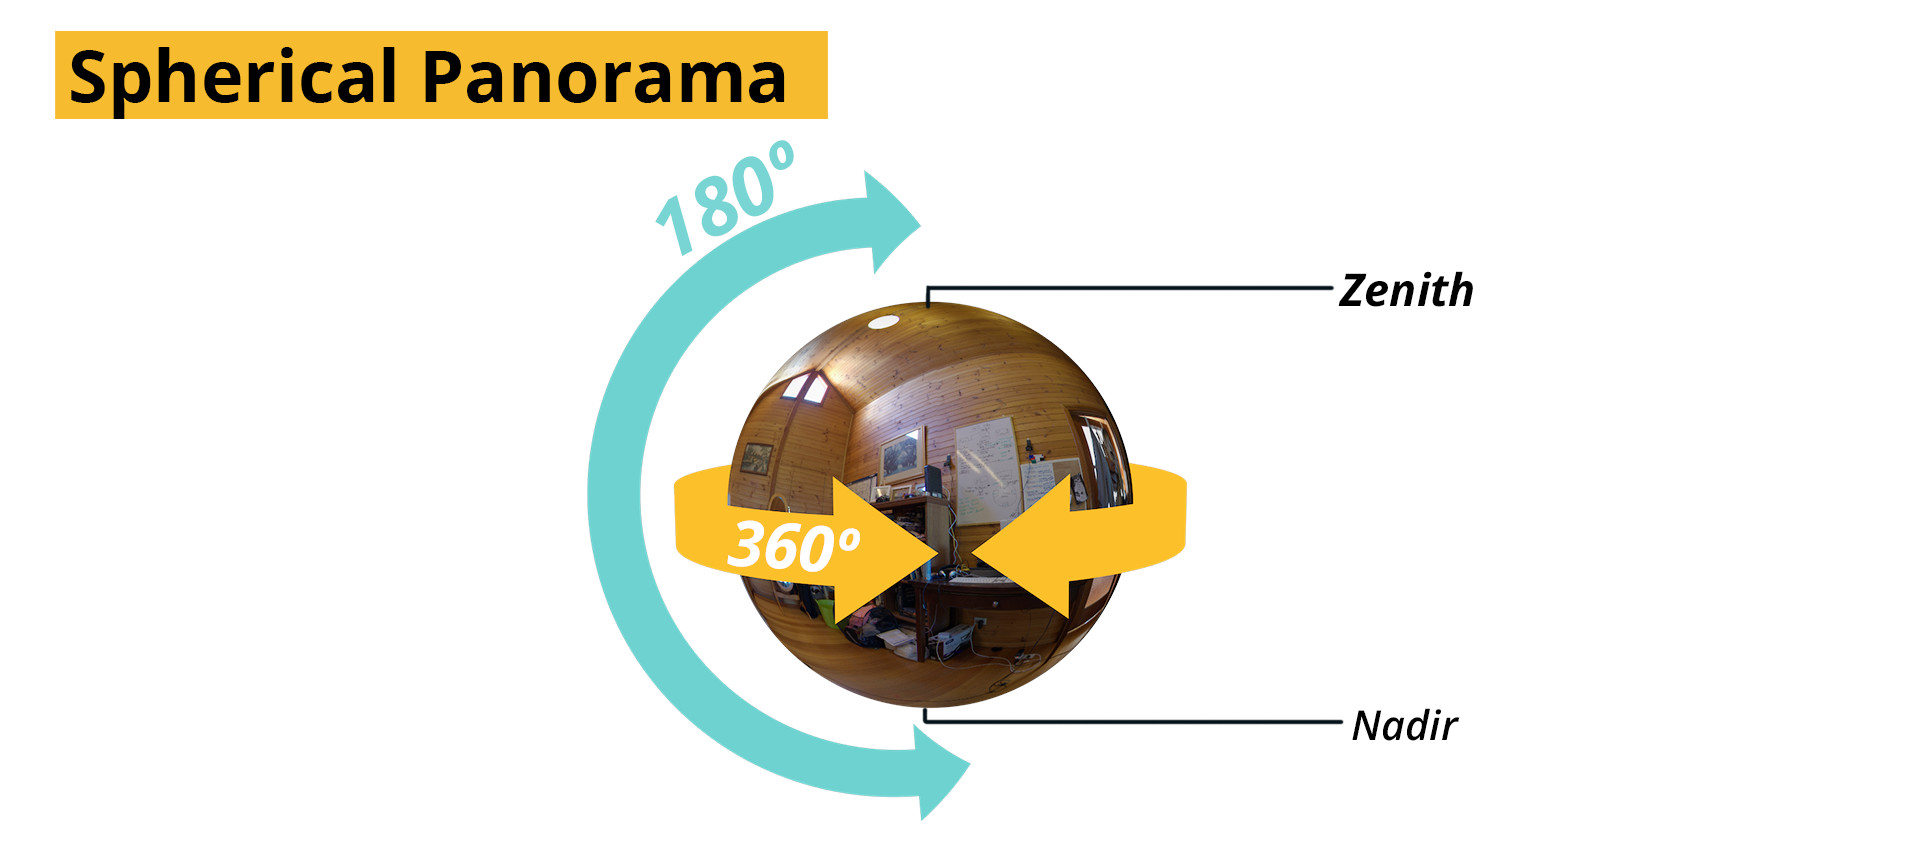
“360 video” technically refers to the horizontal coverage of the panorama, but it’s become shorthand for a full spherical panorama. A fuller description would include the vertical side as well, but “360 by 180 video” just doesn’t have the same ring to it.
When describing the vertical portions of a panorama, the technical terms “Zenith” and “Nadir” are used. Zenith referring to the top, and Nadir the bottom view of a panorama.
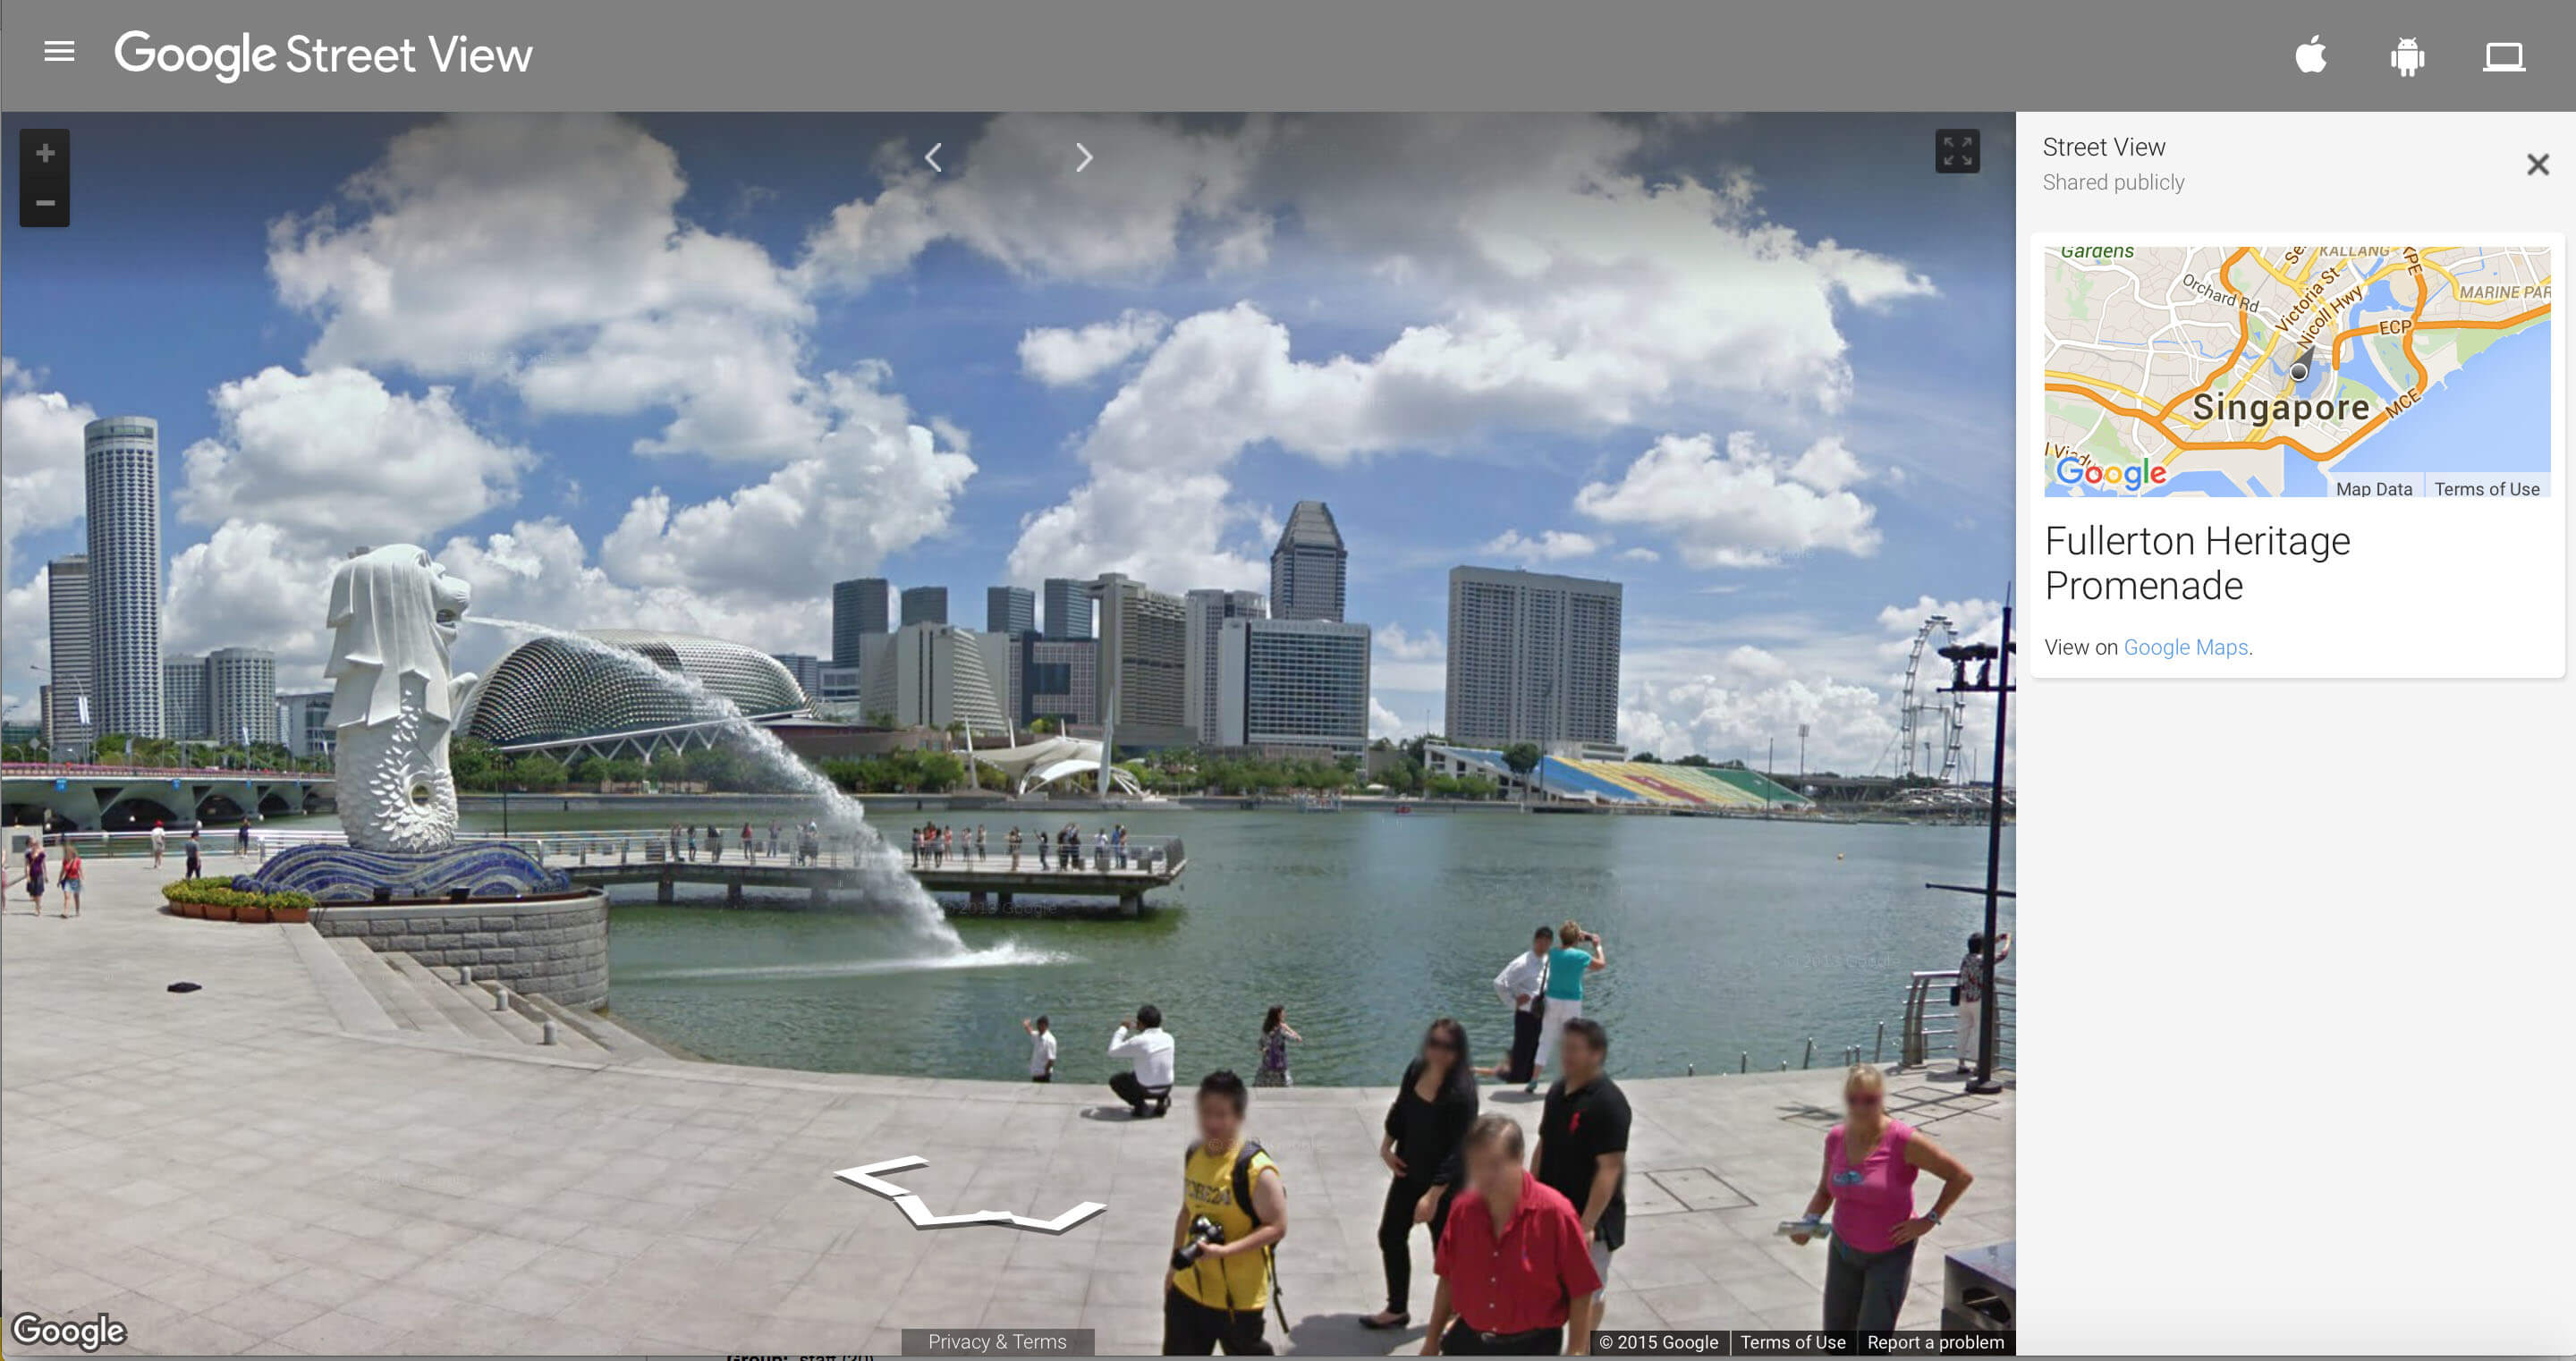
Anyone who has used Google’s street view has seen a spherical panorama. By using your mouse to navigate around, you are free to explore virtually anywhere in the world – whether it’s inner city Venice or Yosemite.
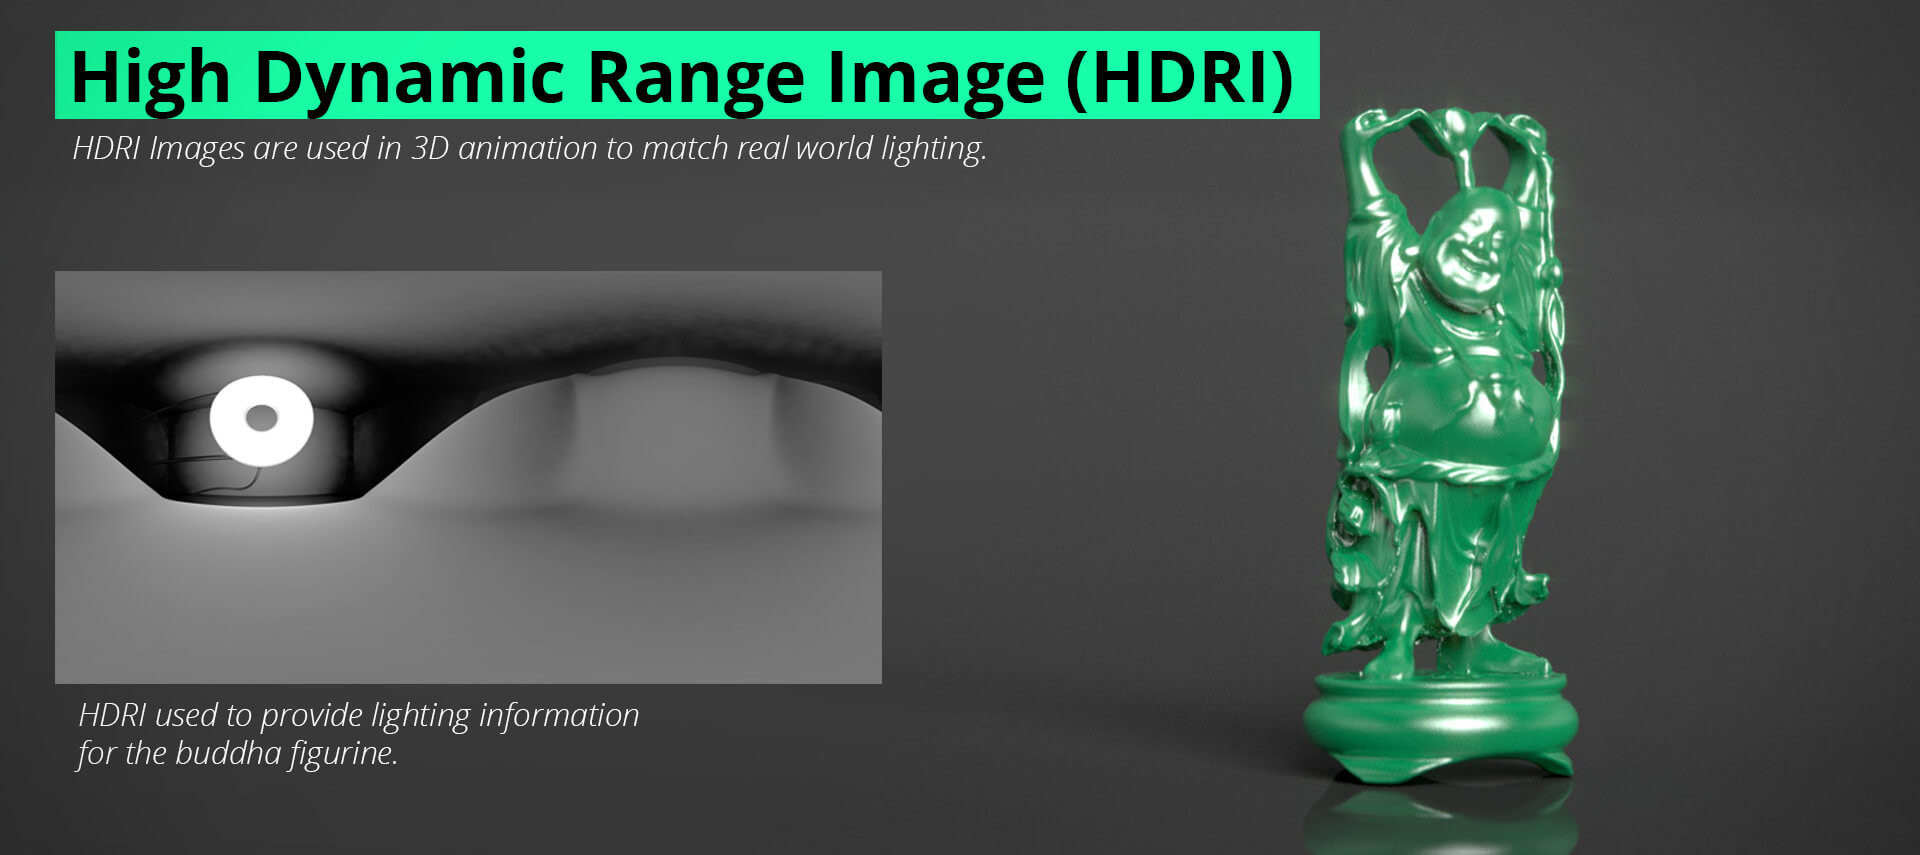
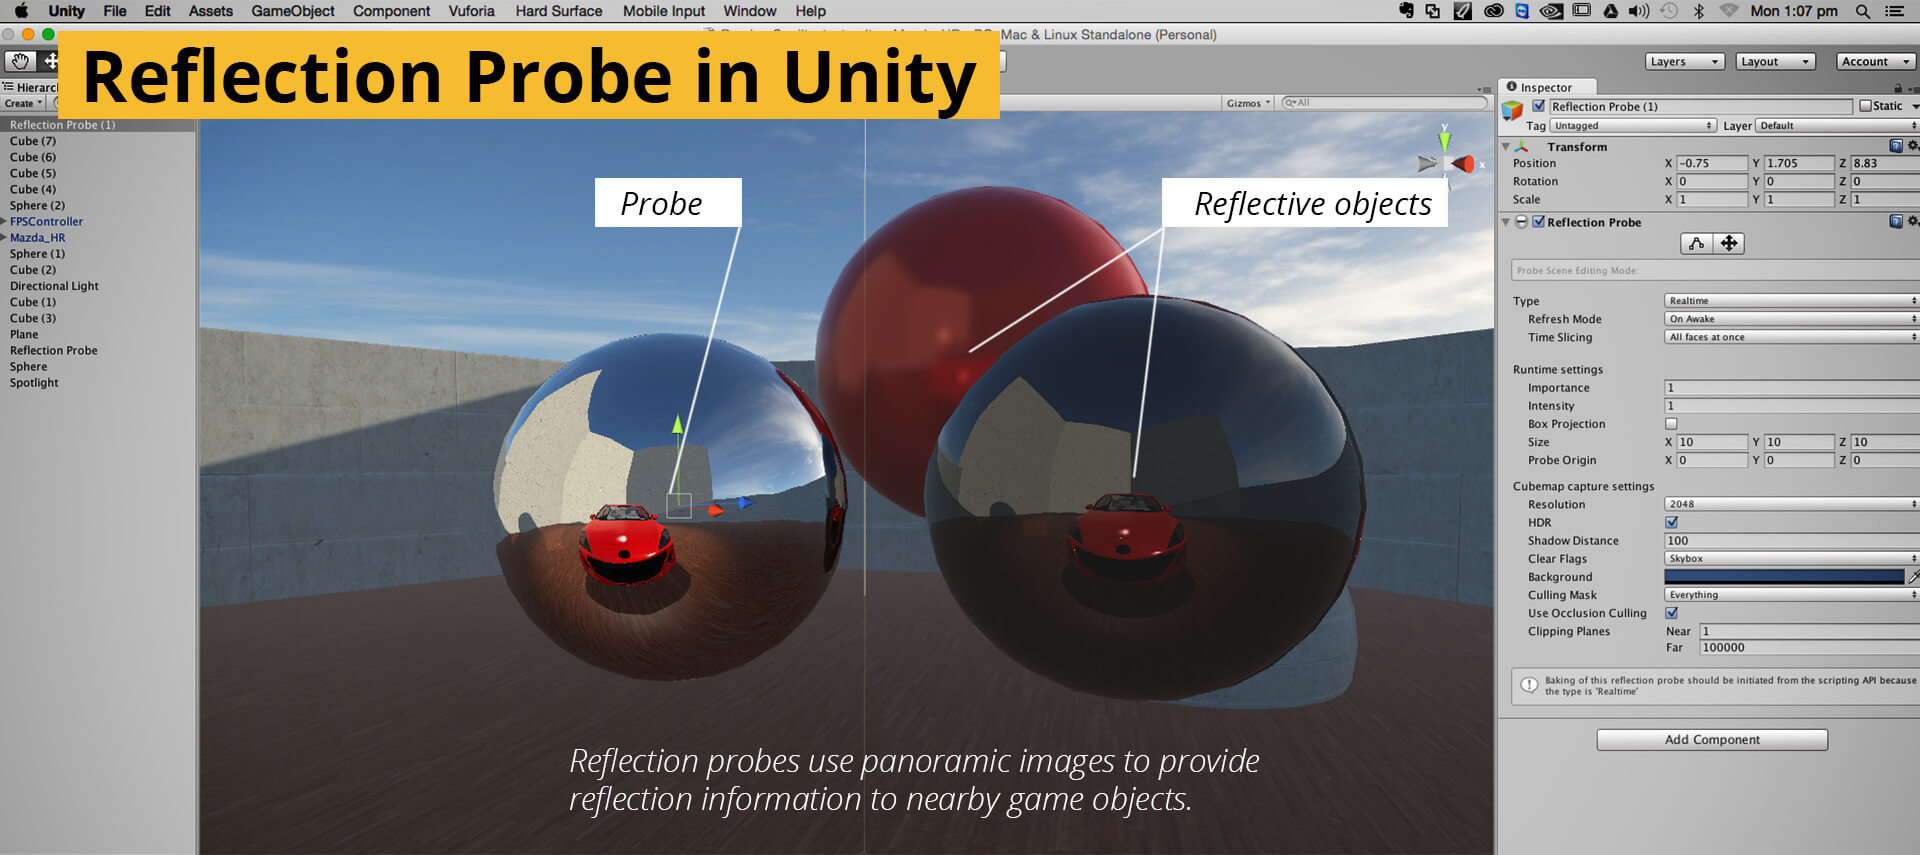
Street view is the best known, but by no means the only use of full 360 degree photos, with many areas from robotics to computer gaming and feature film animation relying heavily on the ability to capture and represent the world in 360 degrees. In 3D animation for example, high-dynamic-range panoramic images have long been used as a source of lighting information from a set or environment. Allowing 3D artists to match the lighting of a digital creature so they blend seamlessly when added to a scene. In computer gaming, many skylines and clouds are nothing more than a distant panorama and many reflections created on game characters are sourced from procedurally created panoramas within the game world.
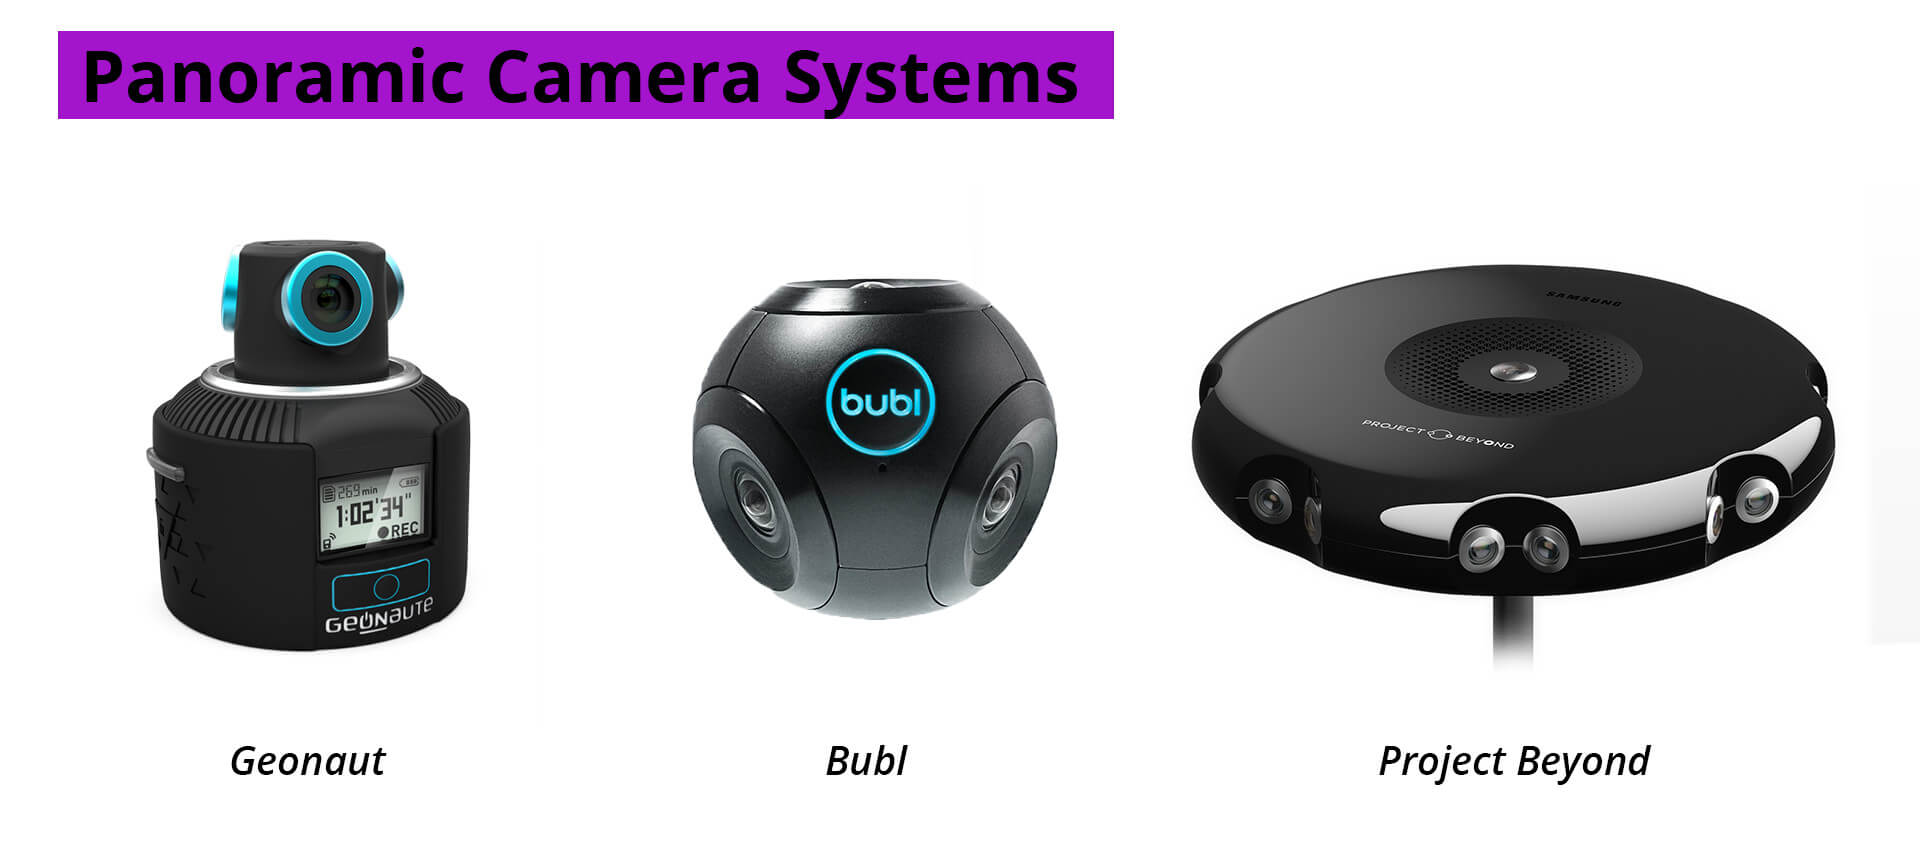
To capture the full scene, a number of photos are usually taken with a very wide angle lens – like a fisheye. Depending on the lens used, this may mean as few as 2, or as many as a few hundred with an telephoto lens. Some cameras, like the Ricoh Theta, can take a full 360 degree photo with only a single exposure, using two fisheye lenses and built-in stitching. More and more cameras are being developed that can capture the scene with only a single button press by building cameras with multiple sensors, with many of them capable of capturing video as well.
Using Google’s photosphere app anyone can construct a 360-degree panoramic photo through a guided capture of a number of stills – and create a street-view of their surroundings. Google’s software uses a smart blending algorithm to counter parallax, more gradually fading from one image to the next.
While the workflow for capturing is similar, the presentation of spherical imagery presents a problem. As a spherical panorama encompasses the entirety of the world around it, we are left with a problem – a picture taken as a sphere does not fit well onto a flat image plane. As the mapmakers of old discovered while trying to fit maps of the round earth on posters. For mapmaking, a number of ways for unwrapping the globe unto a flat plane were devised and agreed upon. The most popular, and the one used today for the majority of panoramic work is the equirectangular projection, also known more affectionately as the latlong – relating to it’s description of the image in terms of Lattitude and Longitude coordinates.
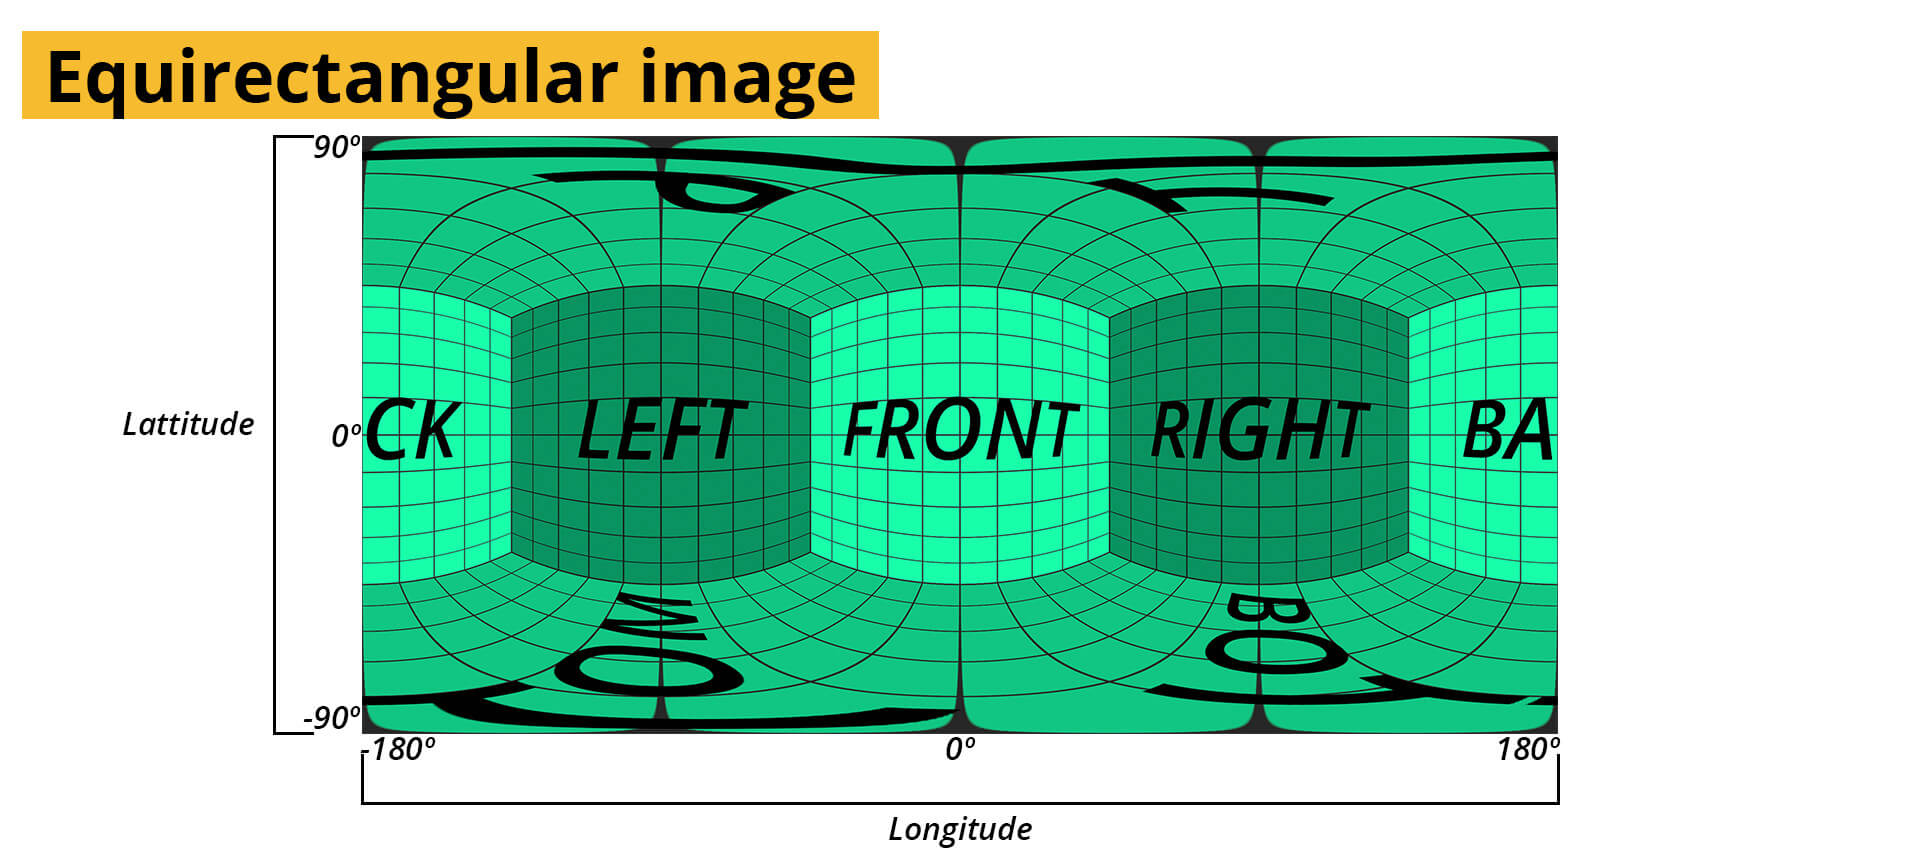
Latlong, or latitude-longitude maps are a way of taking an image that exists as a sphere and stretching it out to fit onto a flat plane. The image dimensions are always in a ratio of 2:1, width to height. Because of the way the image is converted, there is a significant distortion across the image but it is at its most obvious on the top and bottom sections of these images. The following image shows the areas where the distortion is most severe and compares them to the original image captured.
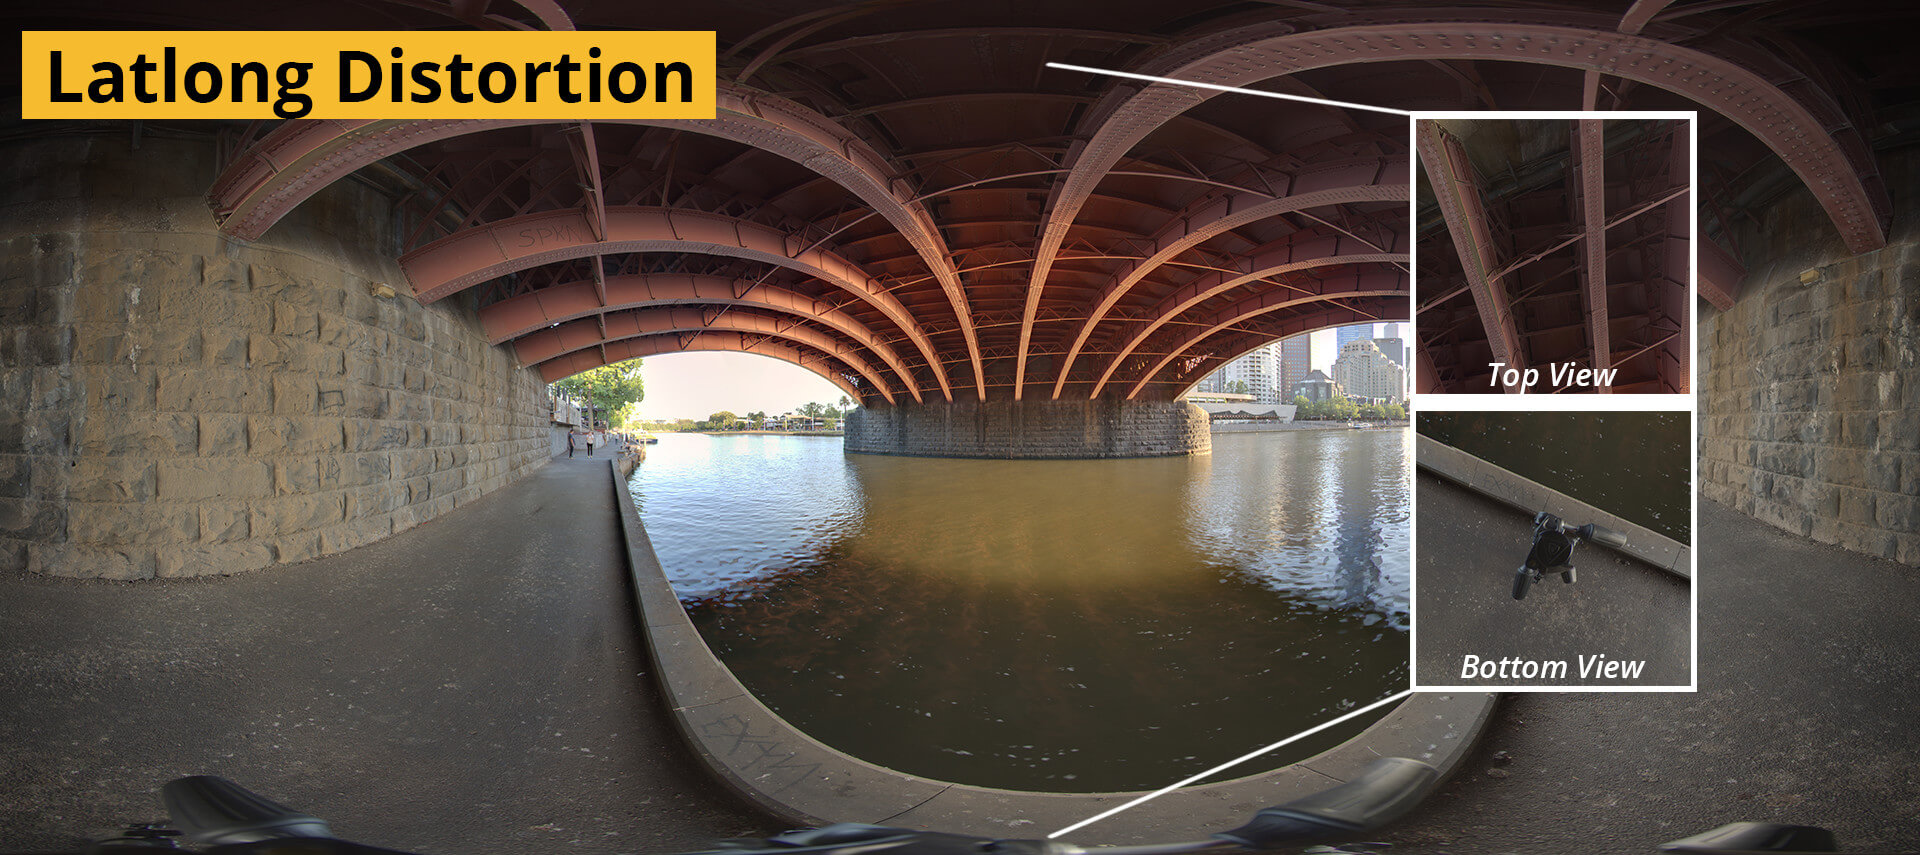
Apart from their uses for navigation, latlong images in photography are rarely supposed to be viewed directly because of their distortion. They are instead intended to be a means of storage, because apart from their specific dimensions, they are then identical to standard digital images and can be managed easily. Moreover, apart from the distortion, a person can quite easily look at them and know what the original scene contained.
To be presented, these images need to be converted back to a normal view, with a large portion being cropped off to remove the distortions. Fortunately, because of the consistency and standards in place for going to and from a latlong images, this is a trivial task in most software.
Although it is not currently widely used in VR, it is worth noting that there is an alternate format for encoding (unwrapping) a spherical image in the form of cube-maps. This method converts the spherical image into a set of 6 equally sized squares, each describing a 90 degree view as seen from the middle of the sphere. Specifically a front, back, left, right top and bottom view.
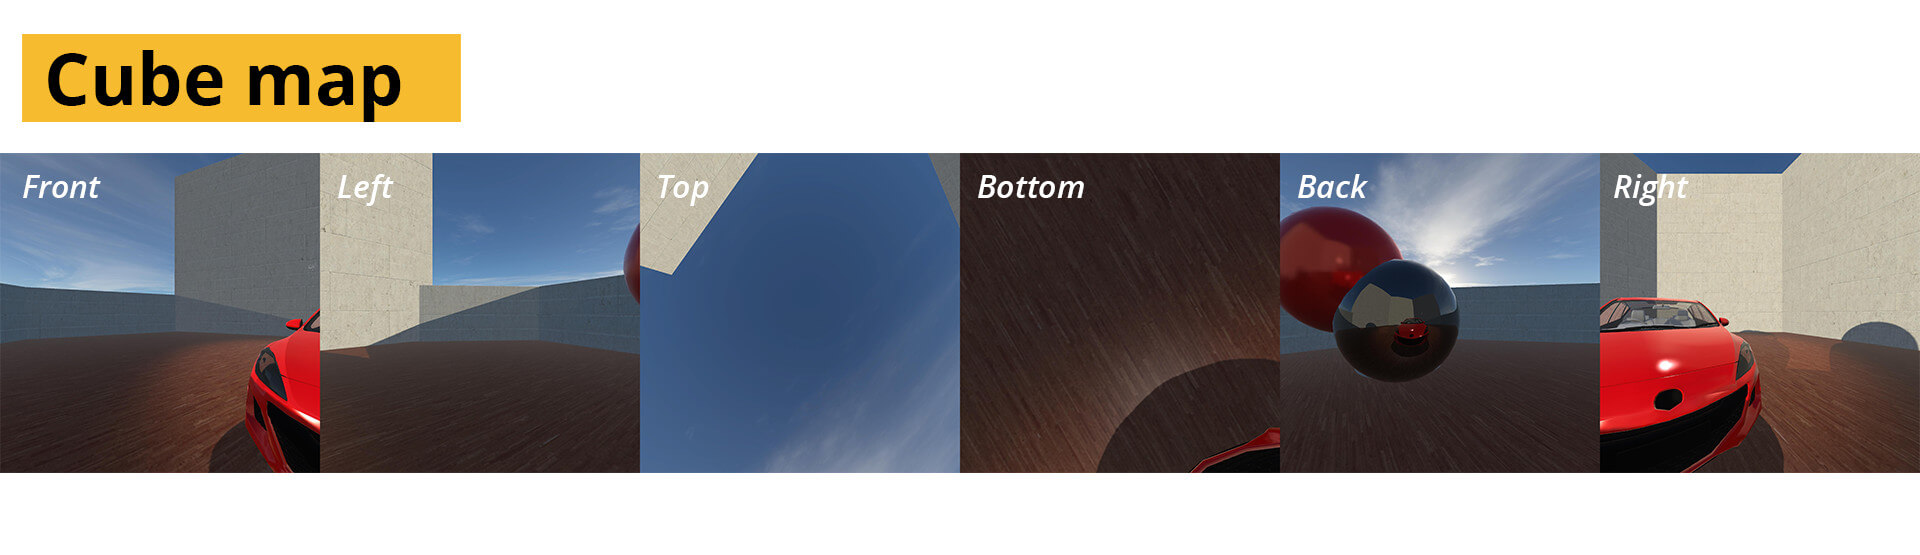
Cube maps are very popular in modern games for their efficient use of storage space, they are all square, which works very well with modern graphics cards because of how they manage memory. There is also significantly less distortion as each part of the image receives an equal amount of pixels. With latlong images, at some of the lower resolutions, the distorted areas may not longer hold enough information to be recognizable once reprojected. With cube maps, as the resolution goes down, the entire image shares the loss equally.
Panoramic video.
With all the similarities between photos and video, how difficult would it really be to transfer this process of panorama making?
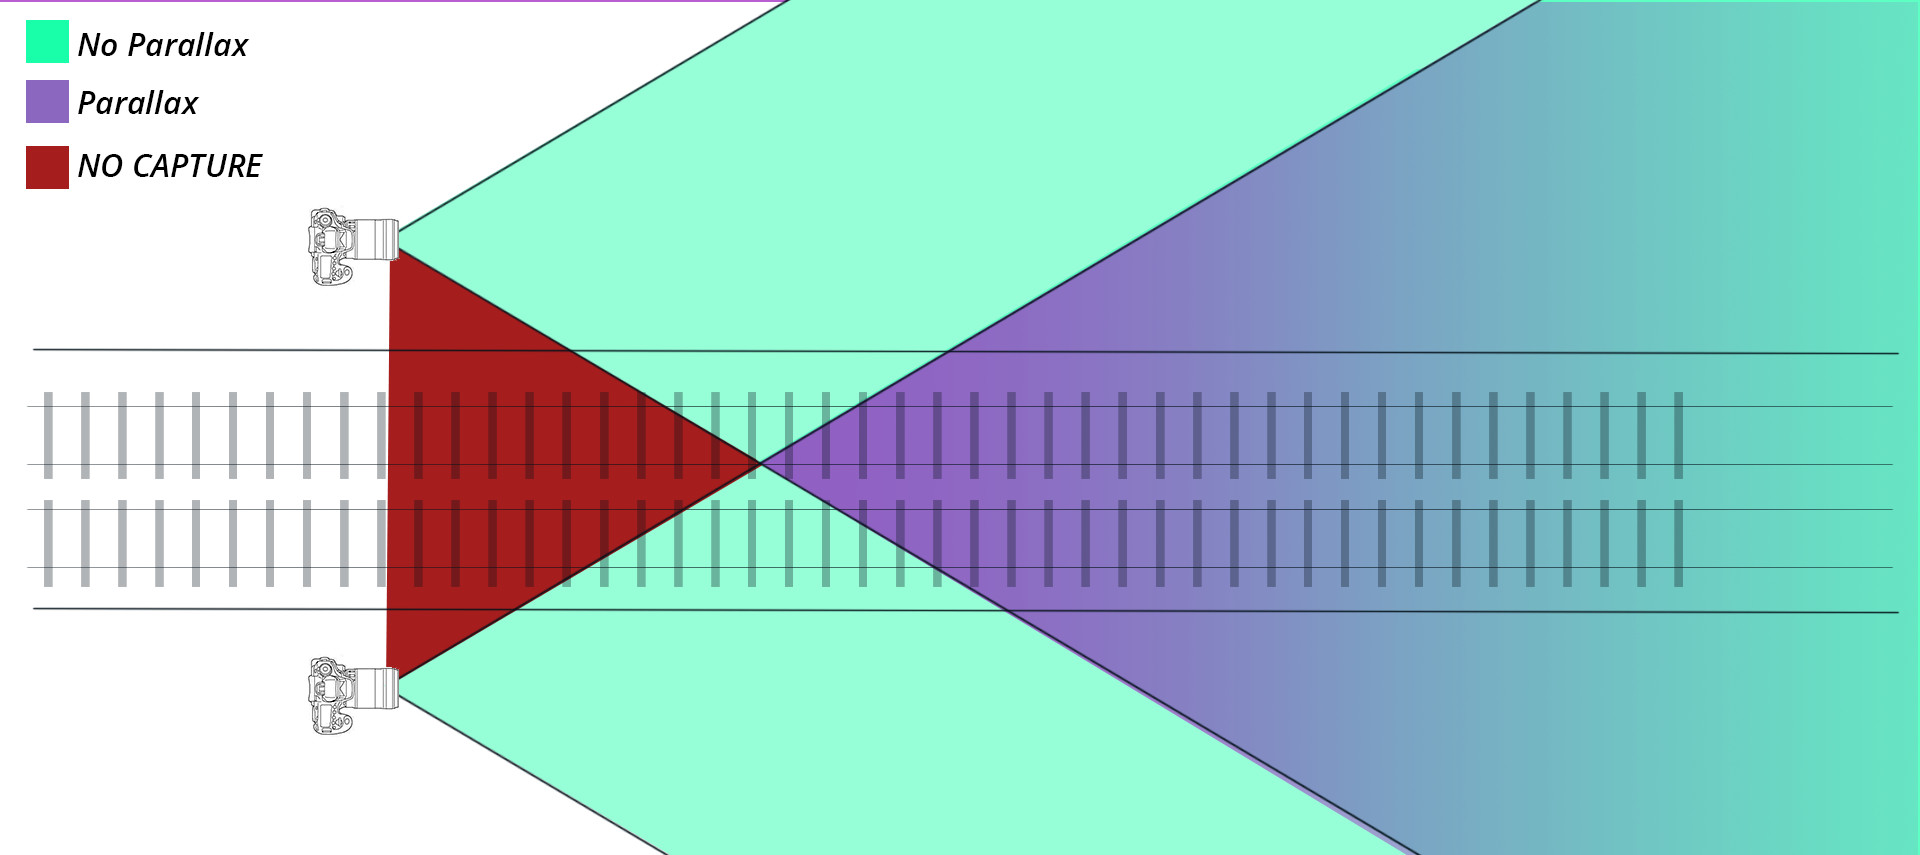
We know that to get rid of parallax we need to rotate the camera around it’s entrance pupil, but because we need to capture multiple views at the same and they can’t all be rotated around the same point in space, parallax is going to be unavoidable. How big the parallax errors will be however, is something we can try to control.
The formula for parallax is complex, and is used for everything from observations of space, to hunting rifles, and of course photography. For our purposes, suffice it so say that as the distance from the no-parralax point increases, so does the error.
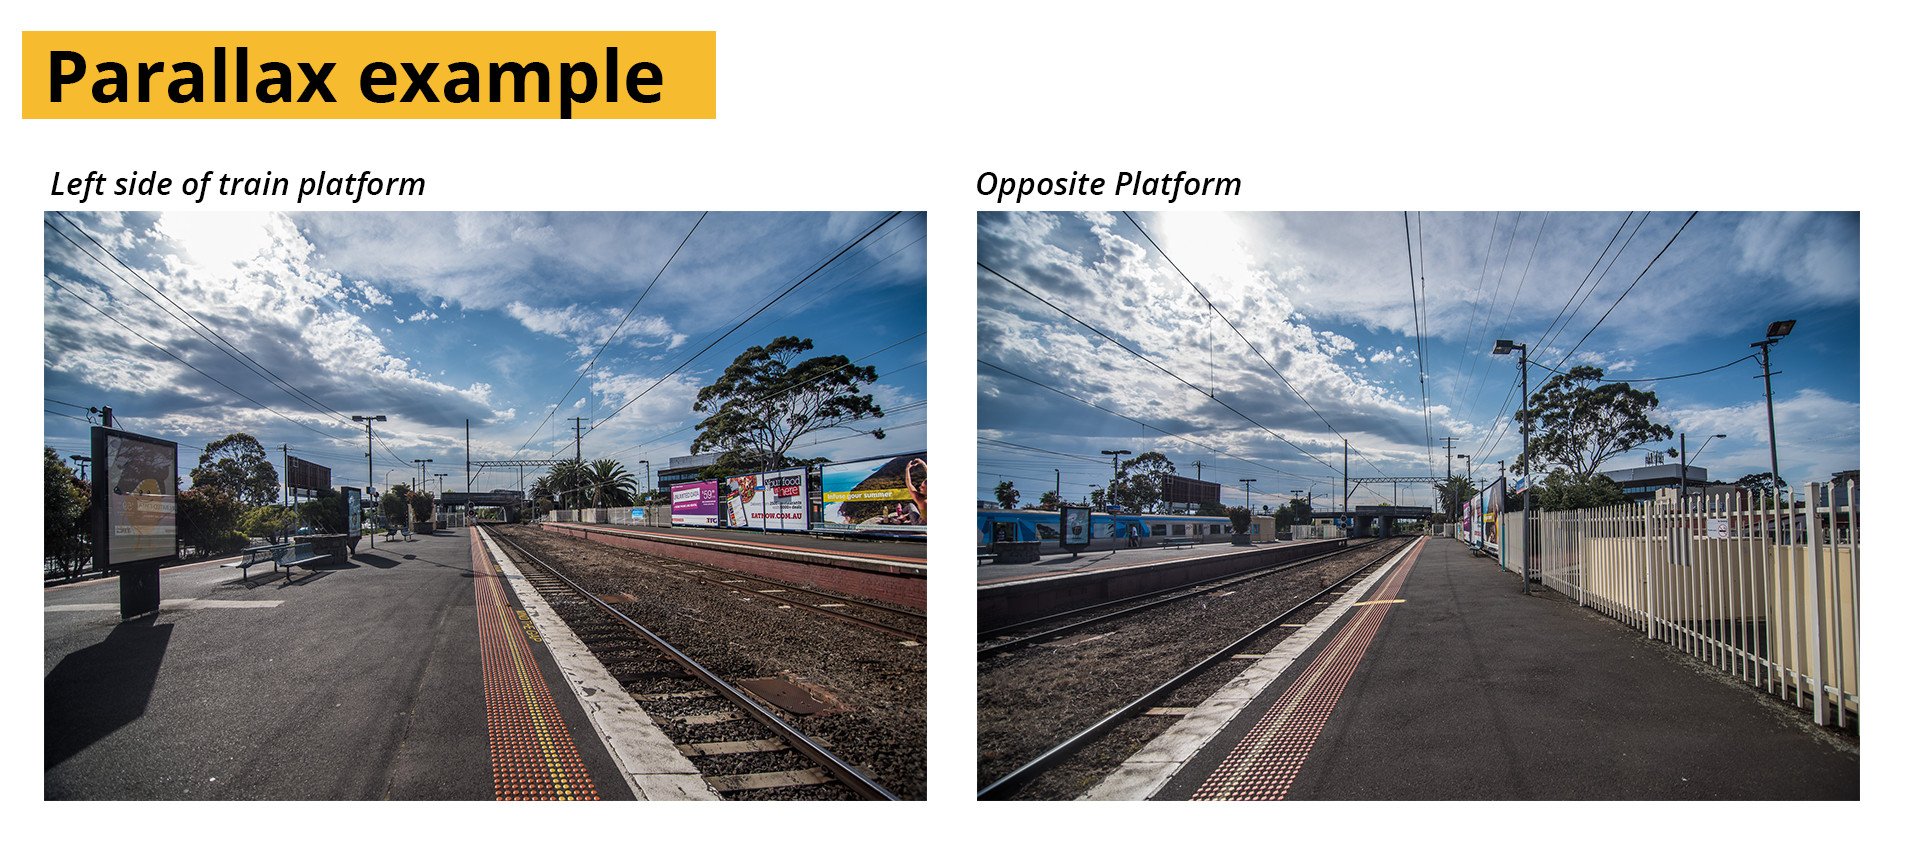
An extreme example is shown below, with two cameras on either side of a train station. The images are wildly different in their foregrounds, with almost every object being in a different place compared to the background. But as the distance increases, objects further away start appearing in the same place in both pictures. Things like the relationship between the sun, and the clouds are identical between both shots.
 For camera rigs with multiple cameras, the goal therefore is no longer parallax removal as it is parallax management. The design of a VR camera array aim to keep all the cameras as close together as is physically possible. For this reason alone, small cameras such as the GoPro Hero series are very popular amongst VR-cinematographers. As will be discussed later though, their size benefits come at a cost.
The number of cameras used also has a ripple effect in the likelihood that the parallax errors will detract from the experience. Fewer cameras may well mean a greater distance between them, and therefore larger stitching errors, but there will be far fewer of them. If shot using only 2 cameras, there would only be 2 areas with errors. More cameras will mean that the individual errors might be smaller, but the shot will be littered with seams.
More cameras also mean more data, more storage and a lot more management whilst introducing many more points of potential failure. Cataloging and storage of footage from even a single camera shoot for a film can be taxing, and with VR, this task multiplies with each additional camera.
The challenge of time
Although Parallax is a big challenge for panoramic capture, it is only part of the story. Video introduces another variable that photographers rarely contend with, continuous motion. Where photography only captures a single point in time, differences in time between the photos in a panorama may very well become invisible. By freezing the motion, photographers are freed from the need for precise temporal consistency – as there is often no way to accurately judge whether the photos were taken at the same time.
Video has a fixed tempo, and that tempo is somewhere between 24 and 30 frames per second depending where you are in the world and whilst the jury is still out on how fast VR needs to be, the fact is that it will be faster than zero.
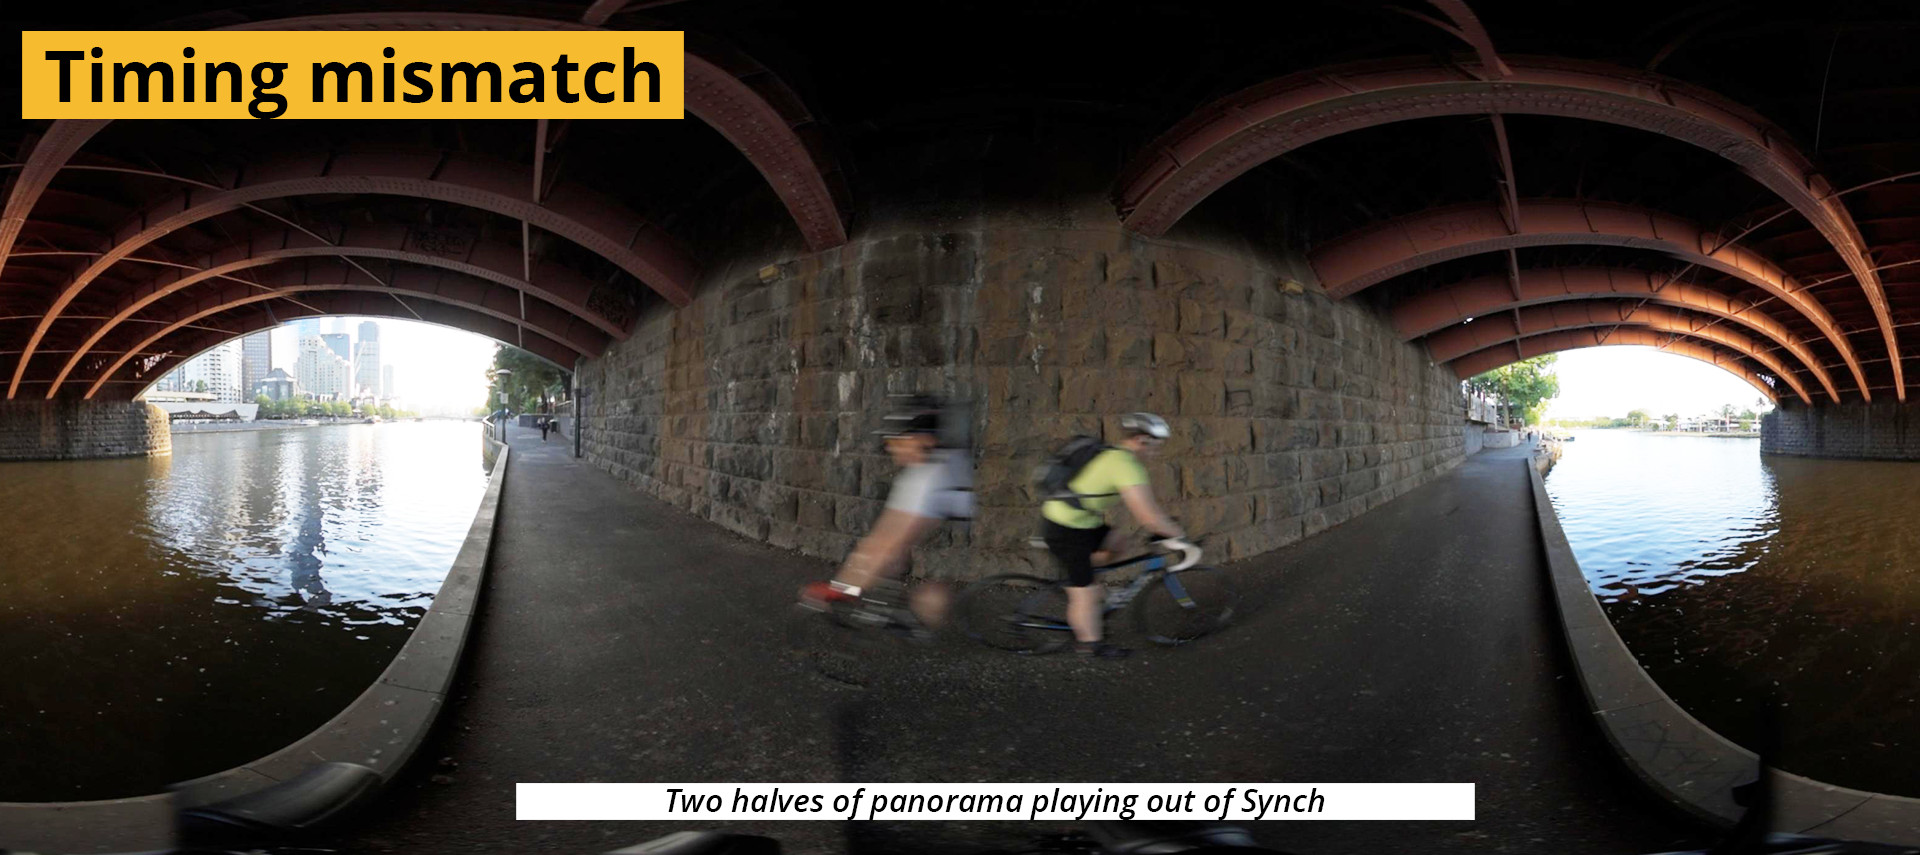
Videos captured out of sync, when stitched together, exaggerates the effect of temporal inconsistency. The human visual system is incredibly sensitive to movement, and even small imperfections or inconsistencies between two sequences are easy to spot. When an actor walks from one camera’s view into another and they appear a few frames too early or late, the whole experience can be ruined. Even more so if there is any camera movement as different parts of the scene can end up moving at different speeds or different directions.
For a “perfect” panoramic video it is therefore very important that the cameras capture the same moment in time. Though this, as with many of the other challenges of VR can be seen as a chance to experiment. There may be situations where large inconsistencies may in fact be warranted, or interesting and may very well be used in service of a larger goal. But as the old saying goes “know what the rules are before you break them”.
As with any new technology – VR is growing in leaps and bounds and many of the problems mentioned here could very well be solved, as new algorithms are made available to be public. Possible solutions are being developed, but the technologies associated with them are currently in their infancy or worse – proprietary. The current state of the art is discussed to some degree in the ADVANCED chapter.
Although not fundamentally important for creating a panoramic film, the choices regarding sensor size, dynamic range (bit-depth) and compression have a ripple effect on the production pipeline. Some will inhibit the level to which post-production may be carried out or the resolution of the final product, others may simply be a joy to handle, but none are by any means a deal breaker for creating content.
In the end, if synchronization and parallax are addressed, all other considerations for camera selection become largely inconsequential for the ability to create a panoramic film. With enough effort and planning, virtually any camera can be used to create a panoramic film. As such, choosing which camera or cameras to use can generally be addressed to satisfy the needs of the project, or as is more often the case – the budget. For details on the pros and cons of different camera combinations see the next chapter.
Further Reading
FxGuide – The State of VR
Photographic Virtual Reality
How to find the entrance pupil / Nodal point.
Source 1 / Source 2
General information about panoramas and nodal points
Guide to panoramic photography
Learn 360 photography
Panoramic photography workflow
HDRLabs tutorials
The Art of HDR
SITE LINKS
INTRODUCTION CHAPTER 2 / THE BASICS CHAPTER 2 / CAPTURECHAPTER 3 / THE STITCHCHAPTER 4 / POST-PRODUCTIONCHAPTER 5 / DISTRIBUTIONADDENDUM / ADVANCED