
Making the most of your footage usually involves at least some amount of post-production if only to enhance contrast. With all the other caveats and limitations of working in VR, I am happy to report that colour operations work exactly the same… But almost everything else doesn’t.
Because all the operations are performed on a latlong, which warps the relationship between pixels in a fantastic way – almost all relationship filters don’t work as they are supposed to, nor do masks or any special effects like lens flares or depth of field. Adding any extra elements to the footage, whether particles, 3D creatures or even simple titles, becomes many times more complicated.
As the final framing is dictate by the viewer, and not the director or creator, and will, by definition, change. So many effects that rely on a static frame, like vignettes and lens flares, don’t work at all, at least not during post. There are ways to incorporate them during the presentation as a kind of real-time “layer” of effects.
Quick Navigation
Colour and Filters
Masks, paint-work and fixing it in post
Stabilising the action
3D – Adding that special sauce
Further Reading
Colour and Filters
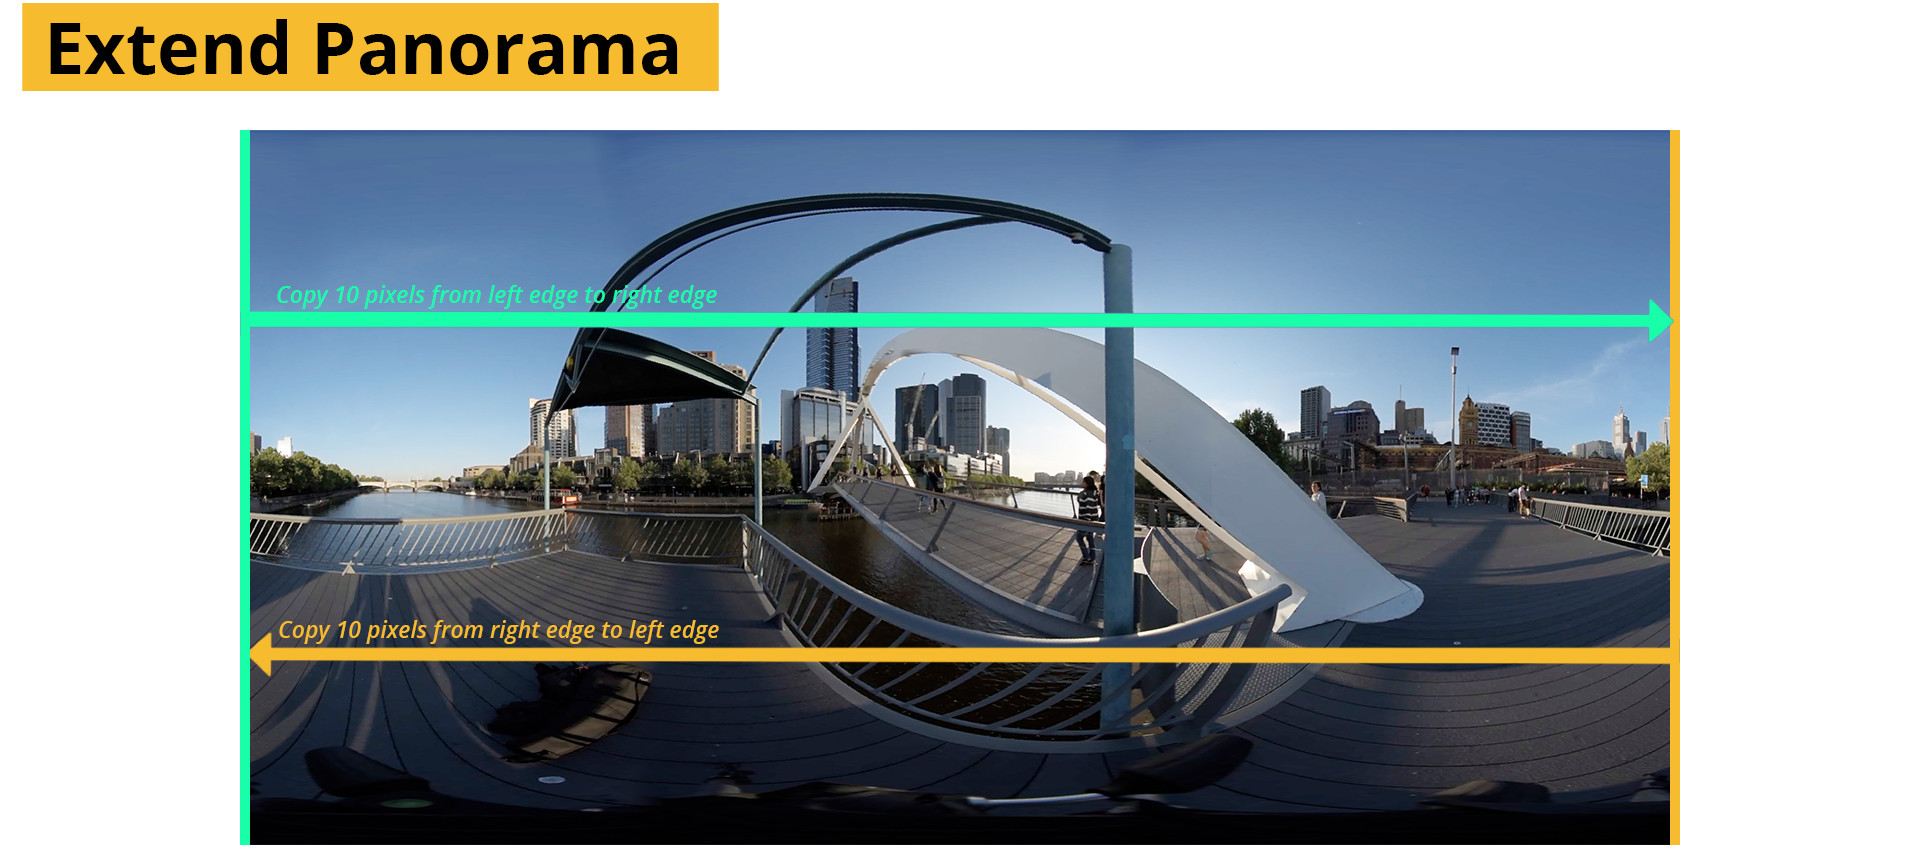
Filtering operations, rely on the pixels around a pixel to calculate a new value for it. A sharpening filter, for example, compares the surrounding pixels in search of areas of contrast. Contrast, being a jump in the brightness difference between two pixels. It then increases this contrast by lightening the bright pixel and darkening the darker pixel, leading to an apparently “sharper” image. But as the edge is literally bordering black (or more specifically nothing), it appears to the filter as a large difference. The edge pixels therefore get a boost in brightness. When the panorama is re-assembled for delivery those bright pixels create a 2 pixel overly bright line running through the whole image.
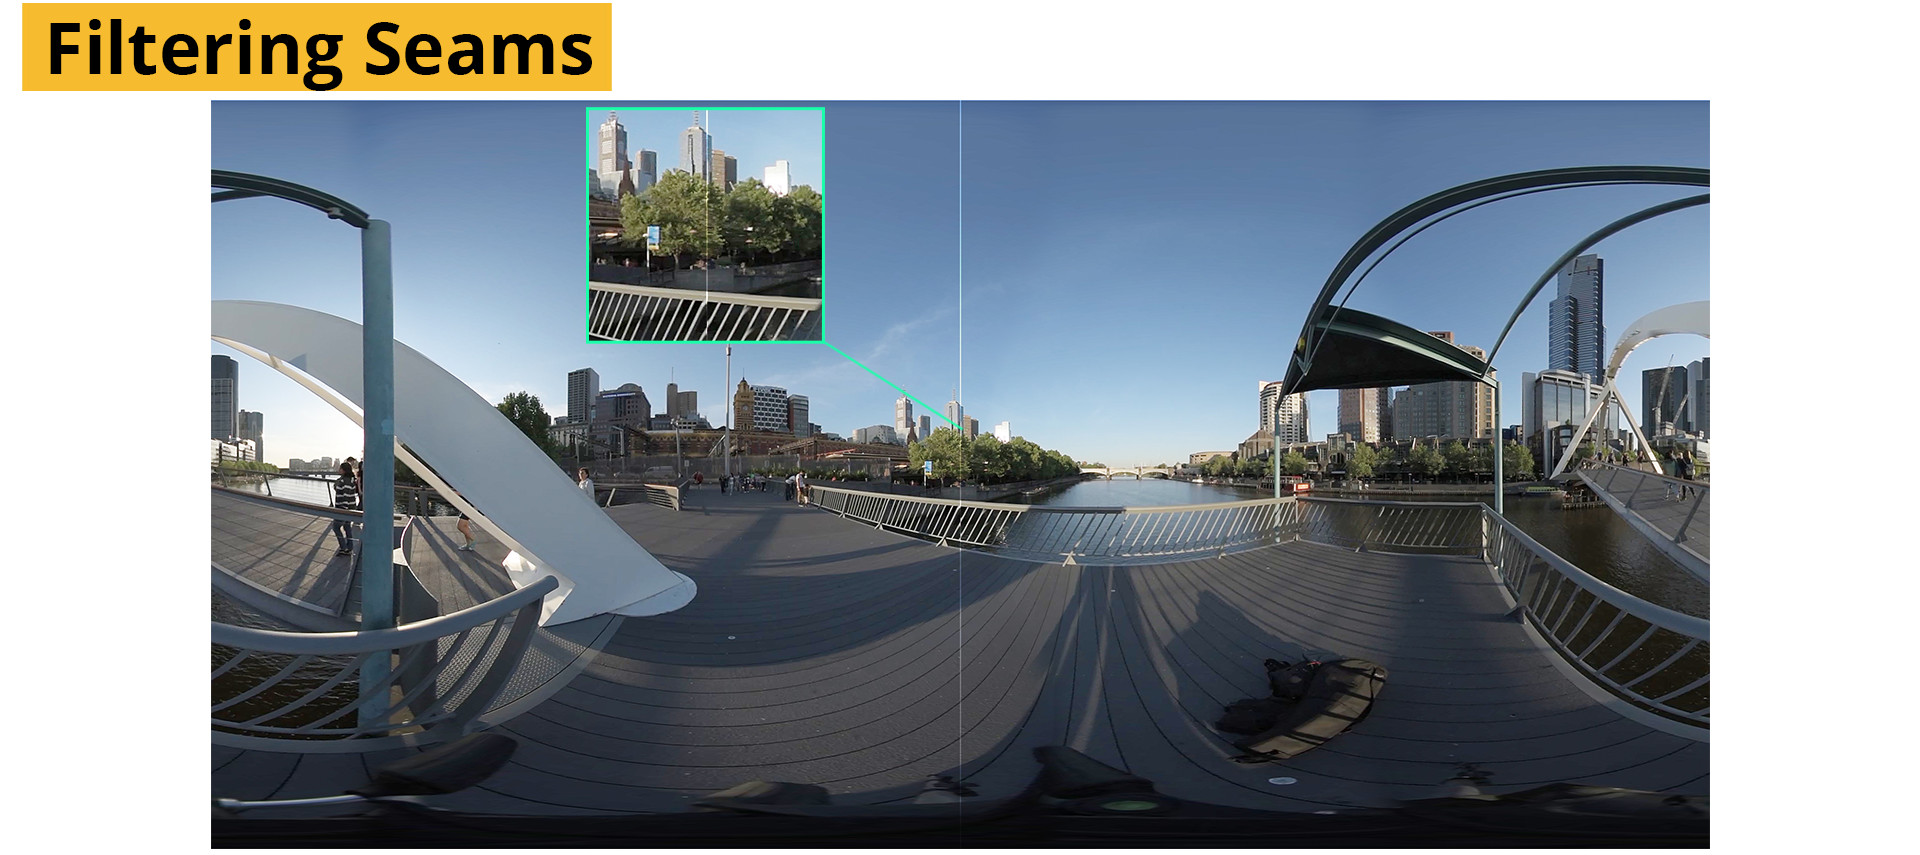
To overcome this, you’ll need to supply the filters with information on those edges by adding a few pixels from the right of the panorama to the left edge, and a few pixels from the left to the right. At the end of the operations, the extra pixels are simply cropped out.
Masks, Paint-work and fixing it in post
Other effects work needs a more directed step for integration, a way to move from the latlong (equirectangular projection) to a traditional perspective view (rectilinear projection) or vice versa. For After Effects, this is simple enough to accomplish one way (with the environment effect and a camera) but much harder to accomplish in reverse without extra plugins. The process also gets convoluted very quickly and rendering times can troubleshooting becomes very difficult. Node based compositors like Nuke, Fusion or Flame are far more geared to dealing with these problems.
Masks
Masking, or roto work, where an area needs to be isolated for effects work or compositing yields inconsistent results in VR. Masks closer to the equator of the latlong will appear approximately the same as expected, but areas closer to the poles will be overly sharp, and depending on the use of the mask could be a problem.
Masks for separating an actor, or object, from a background become very difficult as their movements don’t appear the same way in a panorama. An actor walking past the camera would become distorted as they move closer to the camera, and cross into a different view of the panorama. Under some circumstances this may be passable, as with some color corrections or other areas with soft masks. For others, a temporary view of the scene needs to be created, the compositing work done and the result recombined with the original.
Temporary reprojection
To accomplish any more serious effects work, you’ll need some way to move between the latlong image (known as a equirectangular projection) and a normal image (rectilinear projection). This process needs to be easily reversible.
Be warned though, every time the image is resampled to change it from one projection to another, the image quality suffers – even in very high fidelity packages like Nuke. Sometimes only a single operation is enough to have very clearly negative effect on the quality of the image. As with all visual effects work, aim to isolate effects only to the affected areas and not the whole image.
Many compositing packages offer a way of moving to and from a number of different projection types. Nuke’s Spherical projection node, for example, allows moving between Mirror ball, angular map, latlong, fisheye or cubic projections with ease and with a very useful rotation parameter for both the input and output.
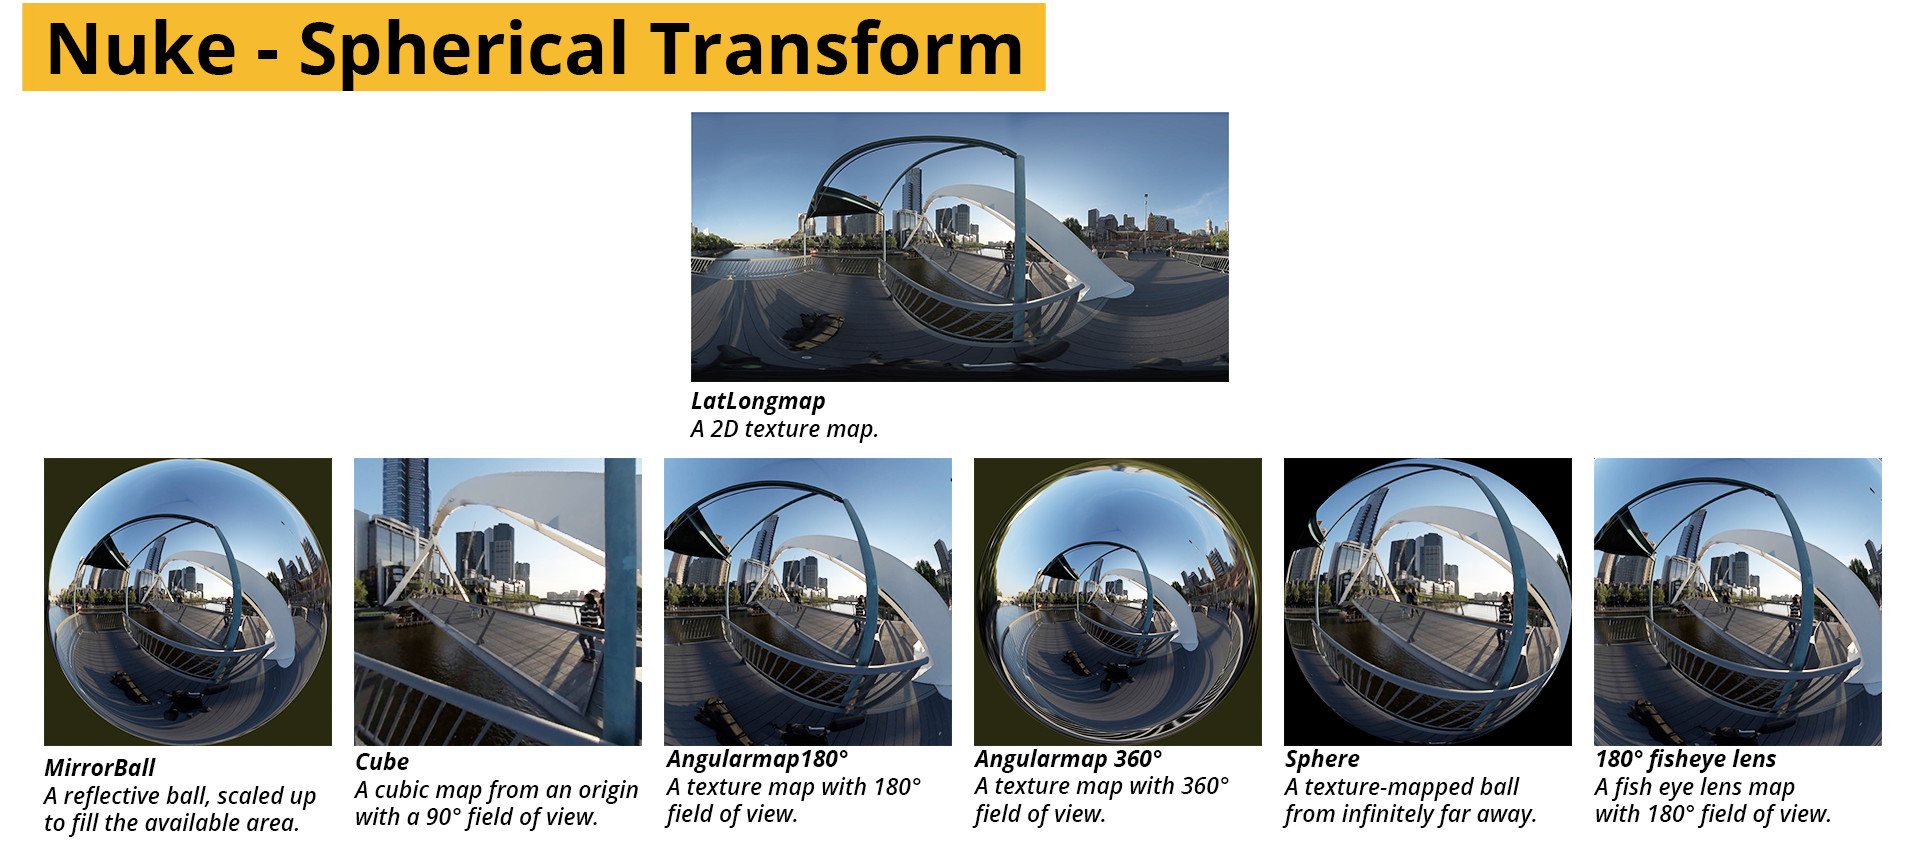
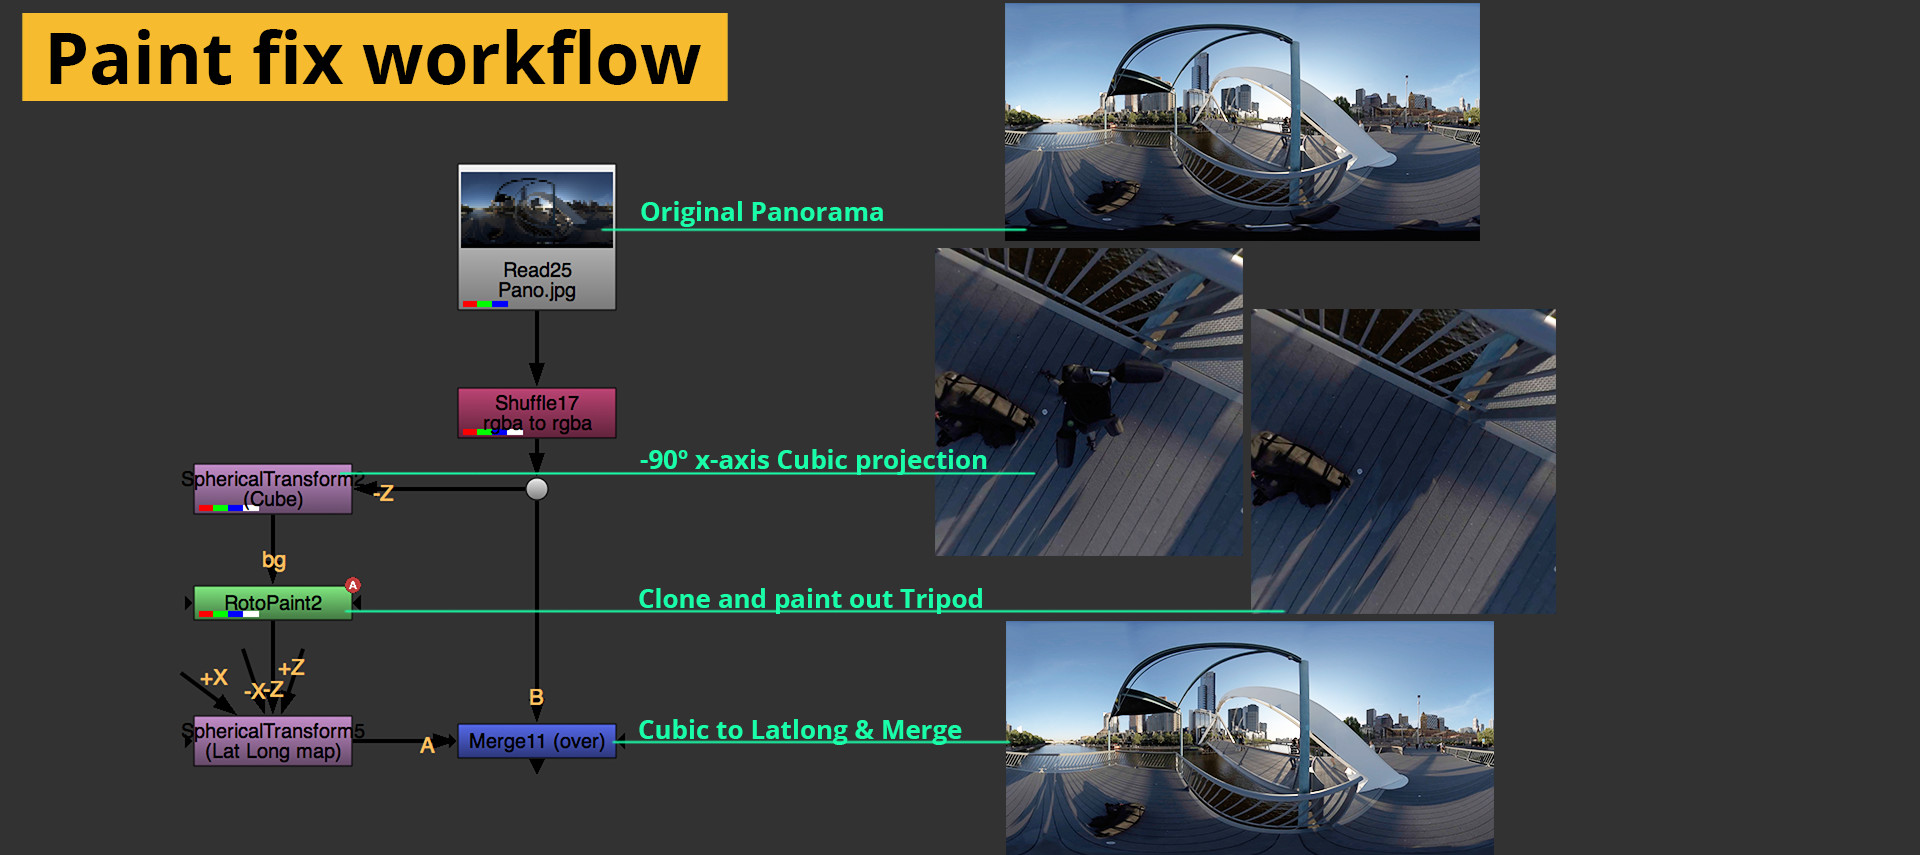
Where only limited use may be found from most of these for effects work, the cubic projection splits the latlong into 6 equal 90 degree square views. These are very well suited for paint, mask and effects work.
Another possible method is to use a virtual camera to render out a section of the panorama as a new piece of footage. This method is incredibly useful for performing camera related work, like 3d tracking and stabilization. This method is also very good at following actions that span a wider area than what fits inside the neat slices of the cubic projection.
To do this, assign the panorama to a sphere, and place a camera in the center looking out. Any conventional camera view can be recreated using this method. It is very important to flip the image horizontally before assigning it otherwise the camera view will be reversed and any calculations performed will be inverted.
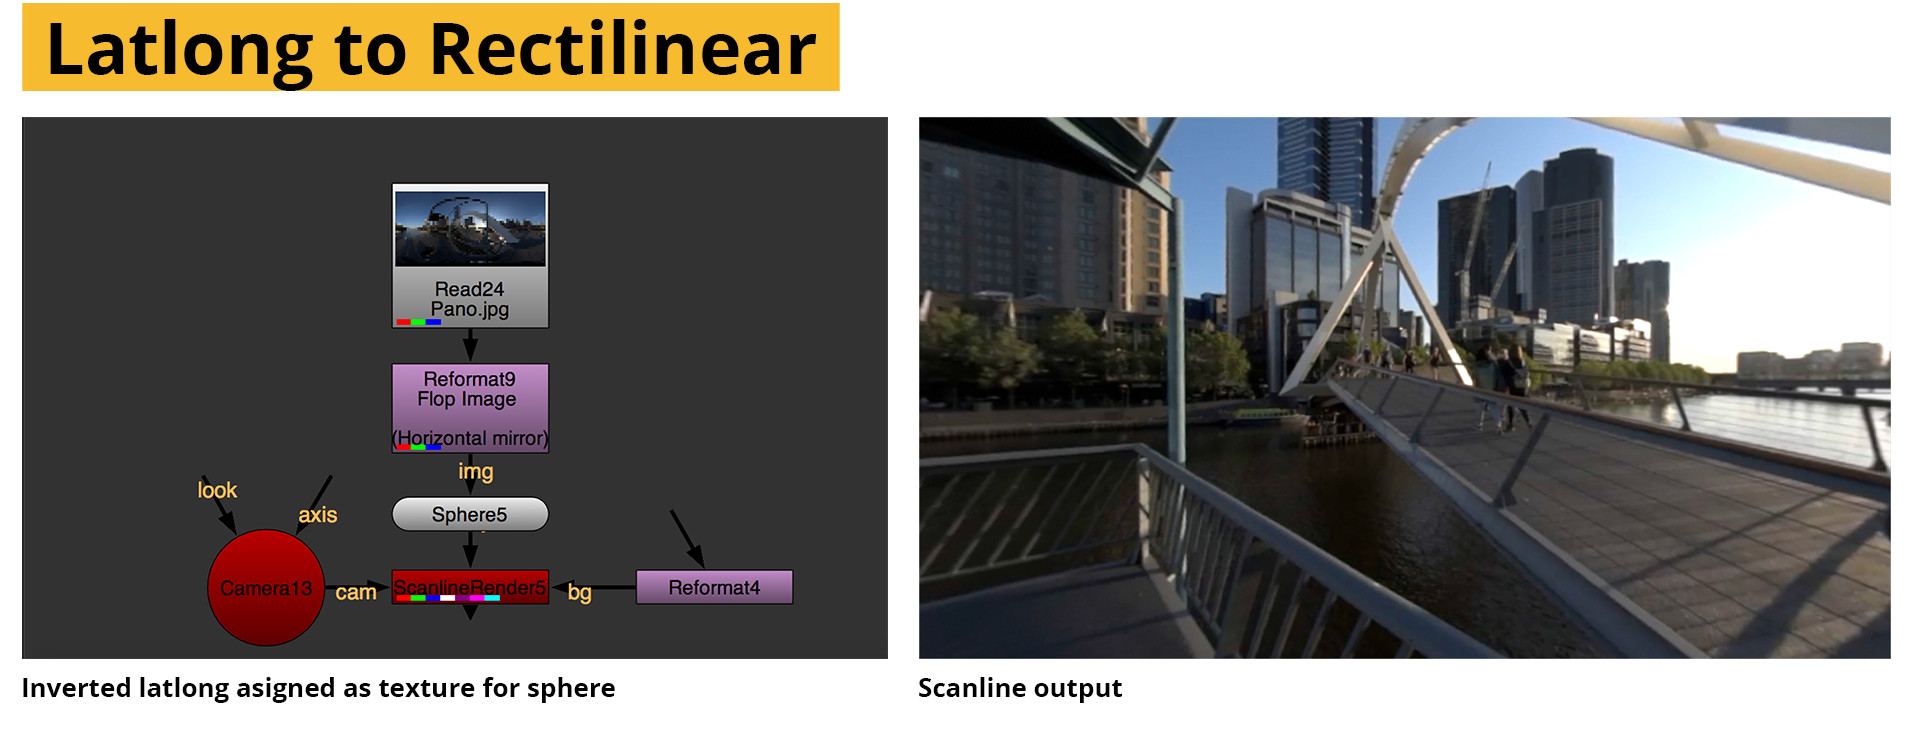
The Nuke scanline render node often has some artifacts at the poles of the sphere, so if the they need work it may be more useful to use, or patch with, the spherical transform.
To send the results back to the panorama, duplicate the original sphere and project the results onto the sphere with a project3d node. Render the sphere with a new scanline renderer with the render mode set the “spherical” instead of panoramic. You can use the same camera, or a new one, when rendering spherically all that is needed is the position location.
Once back in rectilinear, all your effects, tools, and methods will work and the workflow is the same as a regular project.
Here is the workflow used to paint out the tripod from a 360 shot:
Stabilising the action
It may be necessary for a project that the rotations of the capturing cameras be removed to ensure a pleasant viewing experience. It can be hard to focus on the story when you’re fighting motion sickness.
Image stabilization for video can get tricky, especially in footage with big shakes or bumps. Large movements cause black edges to appear when the bumps are removed. Fortunately, in panoramic video, we can’t hit the edge of frame because there is no edge of frame!
Stabilization can be accomplished in a number of ways. Blender (a free 3d application) has a module that can stabilize a panoramic video by tracking 2 unrelated points. It is very straightforward and the workflow is explained here.
Another method is to export a section of the footage with the camera projection workflow described above. The rendered footage can be 3d tracked as normal. To use the camera, invert and apply the rotations to the panorama, in nuke via the spherical transform node. Inverting the rotations effectively counteracts the movements of the camera and (hopefully) leaves you with a rock steady video.

3D – Adding that special sauce
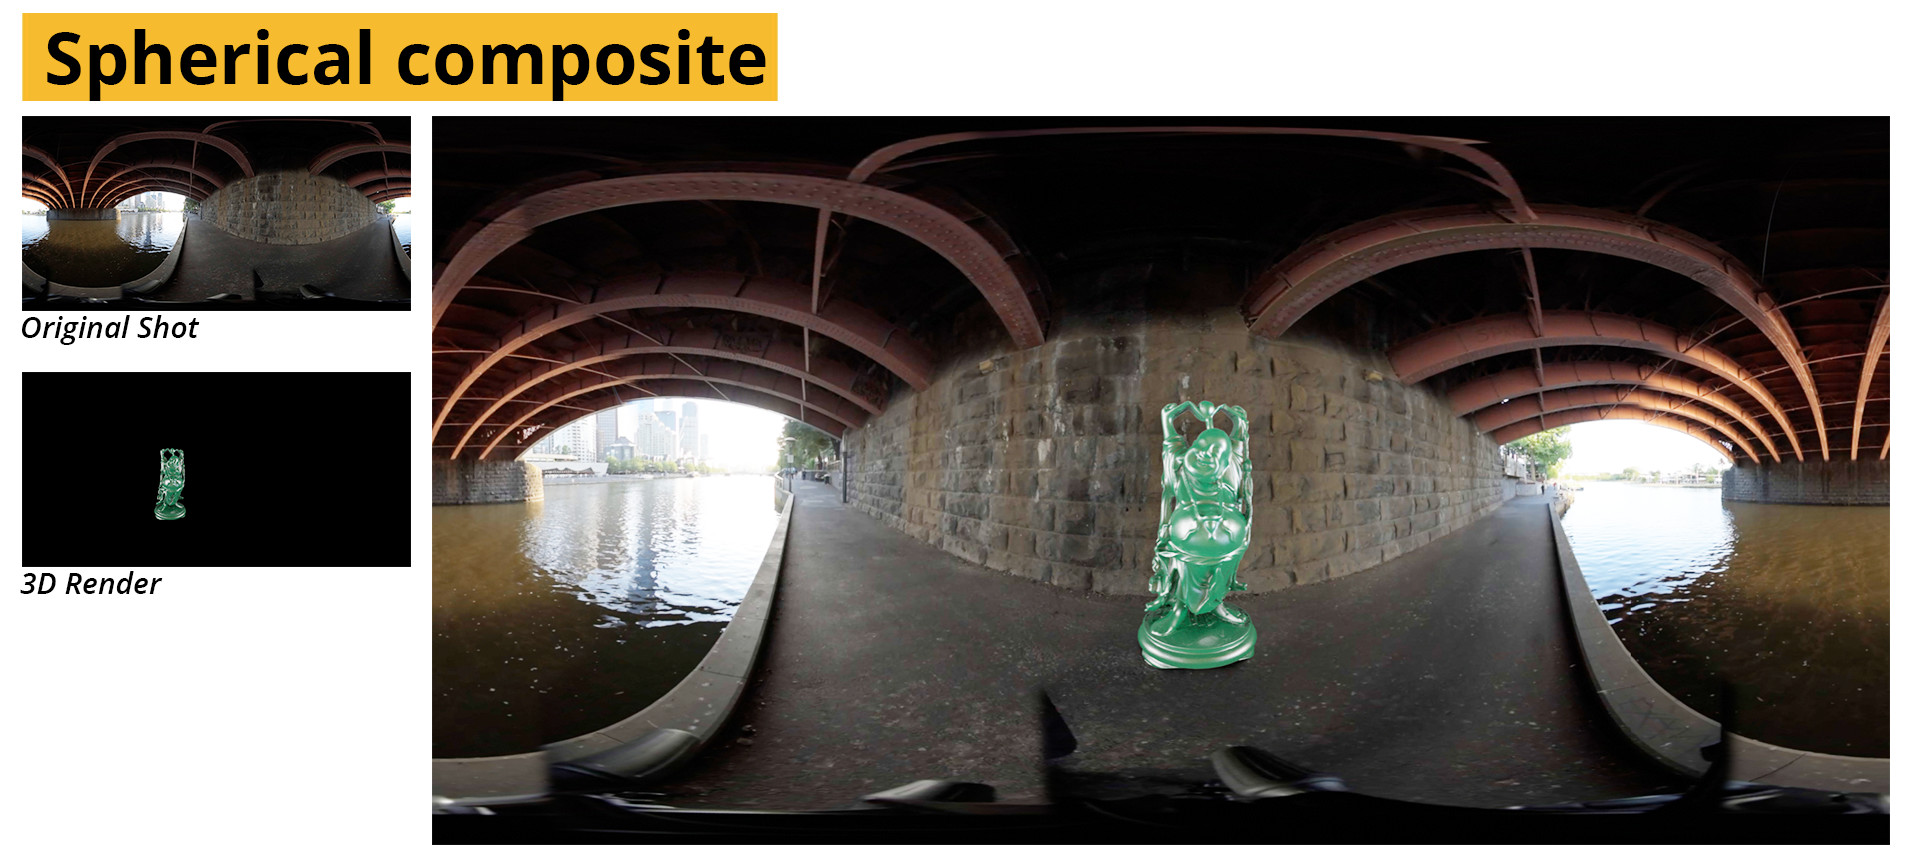
Although we started the whole process filming with many cameras, the intent was always to end up with an image that appeared to have been captured by one “super camera”. In 3D, we truly have access to this ultimate camera rig and rendering to a spherical panorama is little more complicated than a checkbox. Most of the work still goes into making sure there is something worthwhile to render.
We don’t need to render from the same number of viewpoints, or even with the same amount of cameras to create 3D elements as the footage now becomes the ground truth and we’ll render to match it. Simply knowing where the camera was and rendering everything from the same point is enough for a good starting point.
The most jarring difference for rendering VR is that there aren’t any places to hide, no edge of frame to mark the end of an effect, no camera moves to move something off screen, you’re stuck with 360, for better or worse.
One really neat upside is that reflections of the environment, or even limited lighting information, is readily available in the same way an HDR would have been used. Making it easier to integrate aliens, or chrome balls.
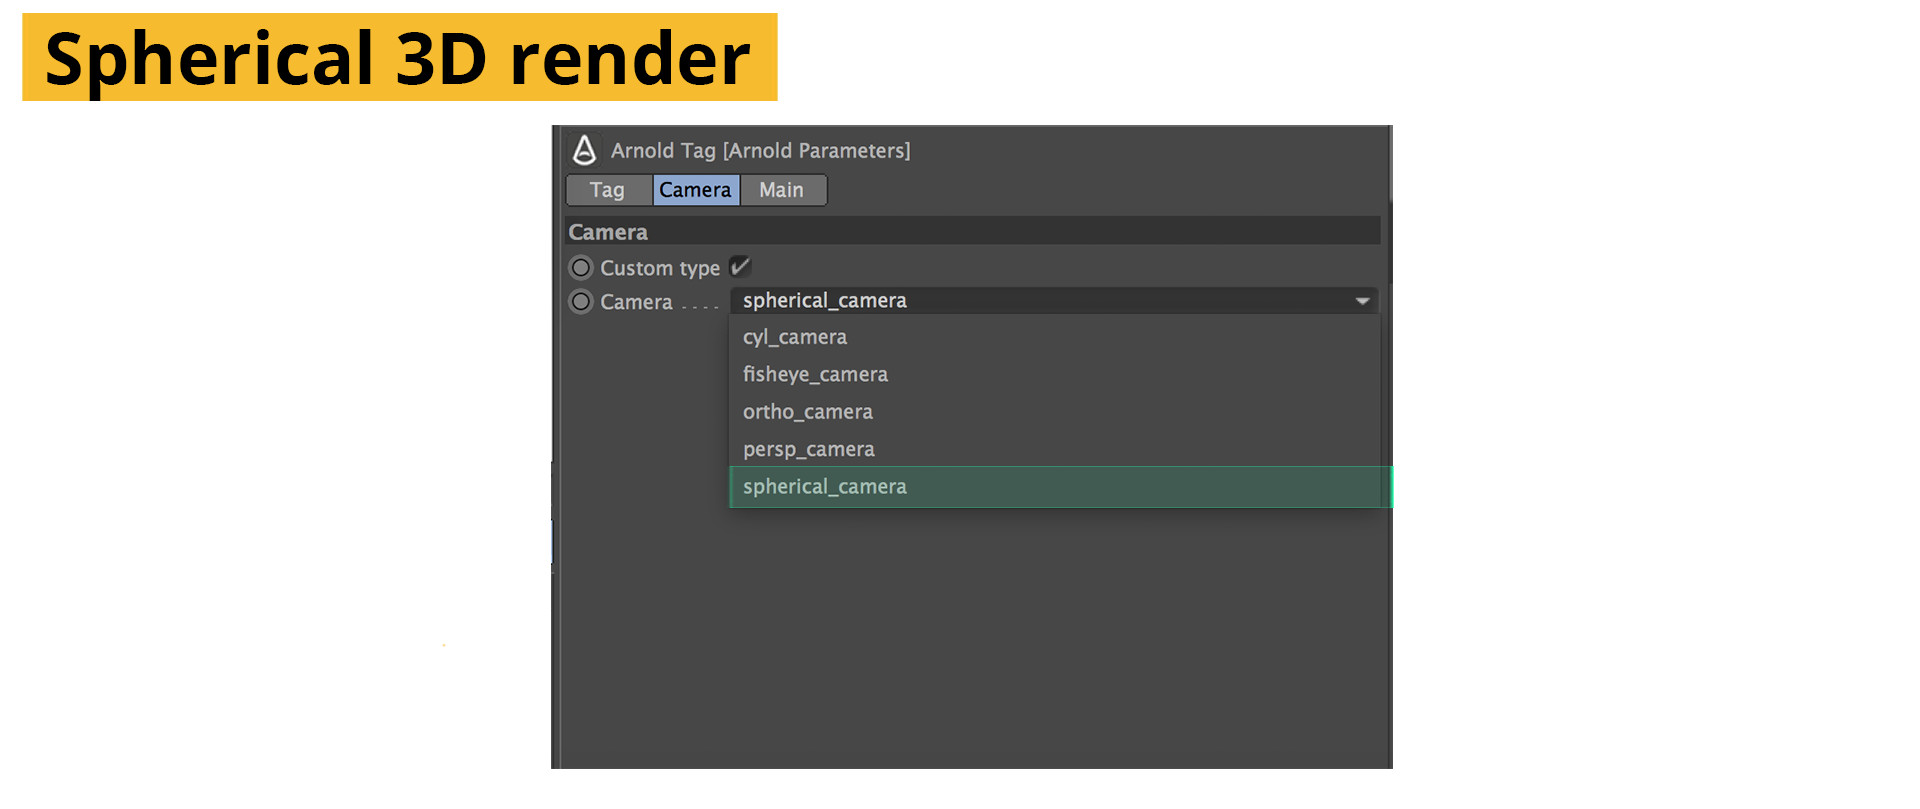
Rendering for VR is a topic that would need it’s own book, let alone a chapter. Fortunately a lot of the workflow remains unchanged for 3D rendering, provided you use a rendering engine that supports spherical rendering. The main production renderers that currently have a strong VR presence are Vray, Arnold and Houdini’s mantra renderer. Though it won’t be long before the rest offer the same features.
Matching your 3D camera to the position of the latlong camera can be done through the 3D track earlier in the chapter. The translation information from the track can be used to place the camera and a simple placeholder sphere can be used to align the footage.
The only notable thing to take note of is that there may be small, but significant, differences in the spherical projection between the renderers. But as long as it matches the footage, and you aren’t mixing and matching, this isn’t necessarily a showstopper.
Further Reading
fxpodcast 294 – Making of “Help”
32-bit workflow in After Effects
Panoramic Projections
Rendering 360 CG Panoramas
Rendering for Oculus with Arnold
Stabilising panoramas with Blender
SITE LINKS
INTRODUCTION CHAPTER 2 / THE BASICS CHAPTER 2 / CAPTURECHAPTER 3 / THE STITCHCHAPTER 4 / POST-PRODUCTIONCHAPTER 5 / DISTRIBUTIONADDENDUM / ADVANCED